Hi, I'm Serkan Tulunay. I've been programming since high school and I've kept improving myself through university, personal projects and self study. I'm currently learning game engine and graphic programming where my main goal is to participate in innovating new technology and give developers the tools needed to create their dream games
GAME PROJECTS

Something's Off
September 15, 2025 - October 10 2025

Knightmare Night
October 22, 2024 - November 12, 2024

Asteroid Explorer
April 28, 2025 - June 16, 2025

Secrets Of The Mansion
January 16, 2025 - February 13, 2025
Information
Engine: Unity
Language: C#
Duration: 3 Weeks
Version Control: Perforce
Contributions
Enemies
AI
About Project
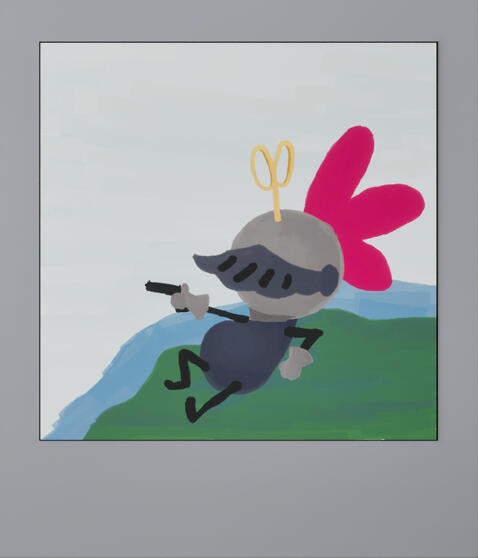
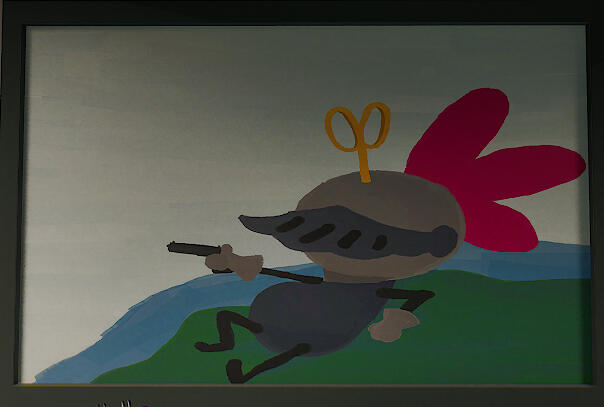
Knightmare night is a game where you're a toy knight and want to protect your kid from getting nightmares by defeating nightmare ghost until the sun arises. You can hack and slash, throw your shield to hit the ghosts from distance.
AI
The AI uses a behaviour tree which has nodes that holds the behaviour for the enemy. I decided to create a base enemy tree behaviour class so I can create sub classes of the behaviour tree, where each enemy type had their own type of behaviour tree. The tree has a node class which represents tasks/ behaviours. By creating new task we can assign these tasks to the behaviour tree but also to the root node which will store other nodes inside.
Behaviour Tree
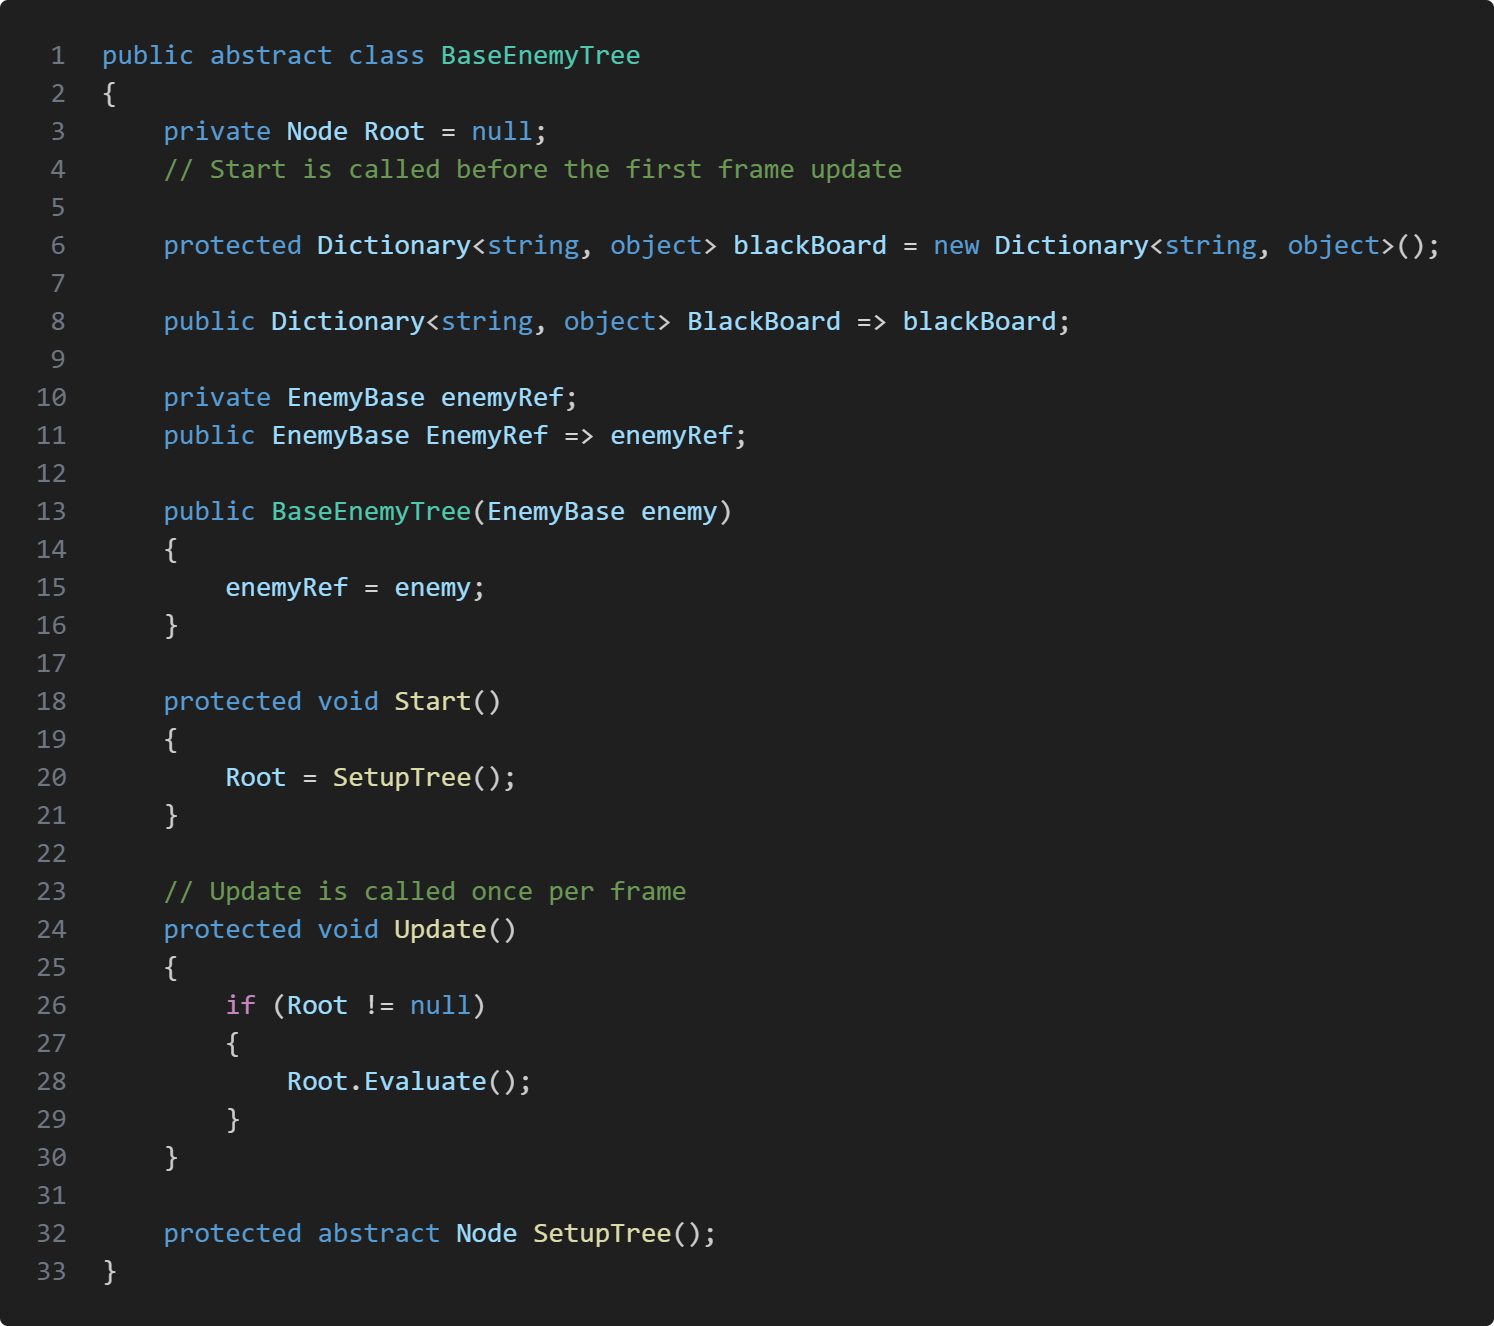
The BaseEnemyTree is an abstract class that holds is meant to be inherited by other behaviour trees for specific enemy types. The root node represents the starting point of the behaviour tree and gets evaluated each frame which in turn starts the enemy's decision making and actions. The class also has a blackboard that allows the ai to store or retrieve information.The tree also has a reference to the enemy game object for future uses.in start we assign the root node to the return value of SetupTree() function. In the Base class it's an abstract function but SetupTree() is where we create our root node and if we want to create a more complicated behaviour tree we can add node children to the root node.
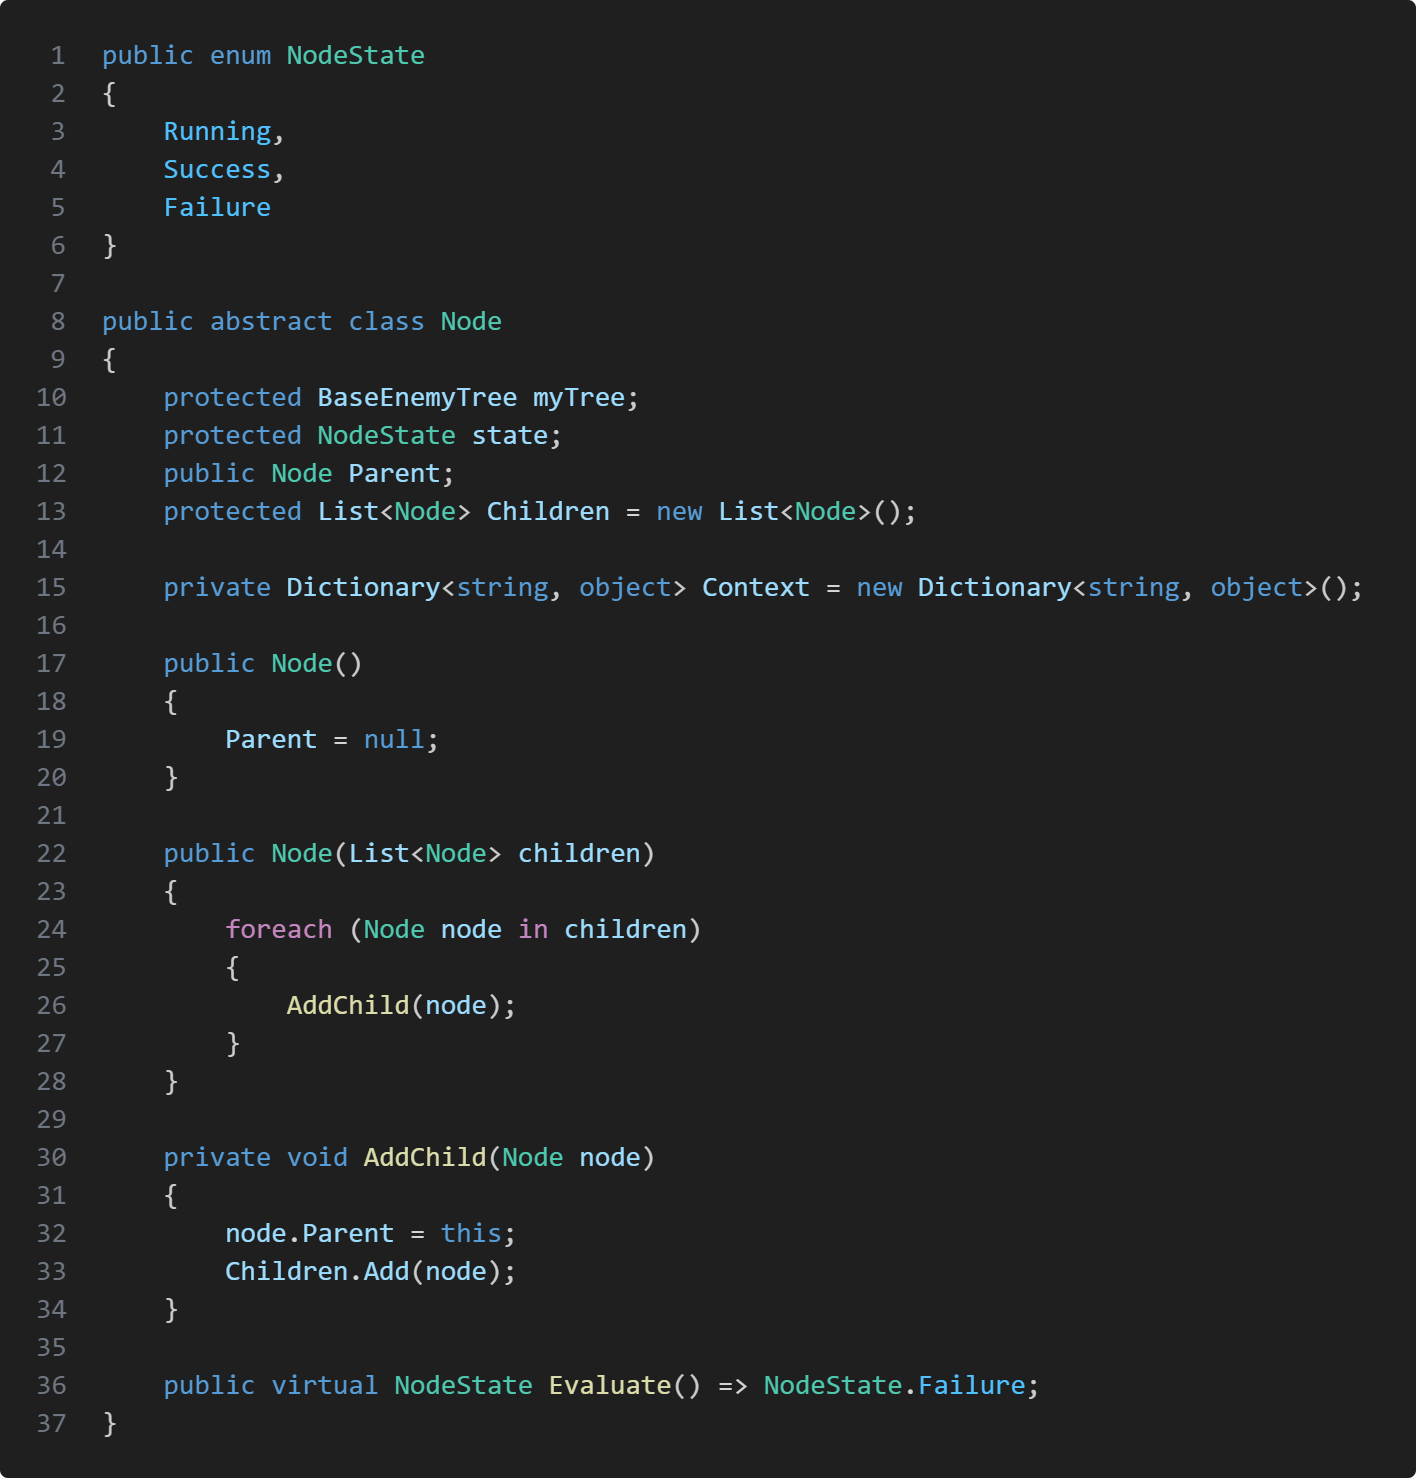
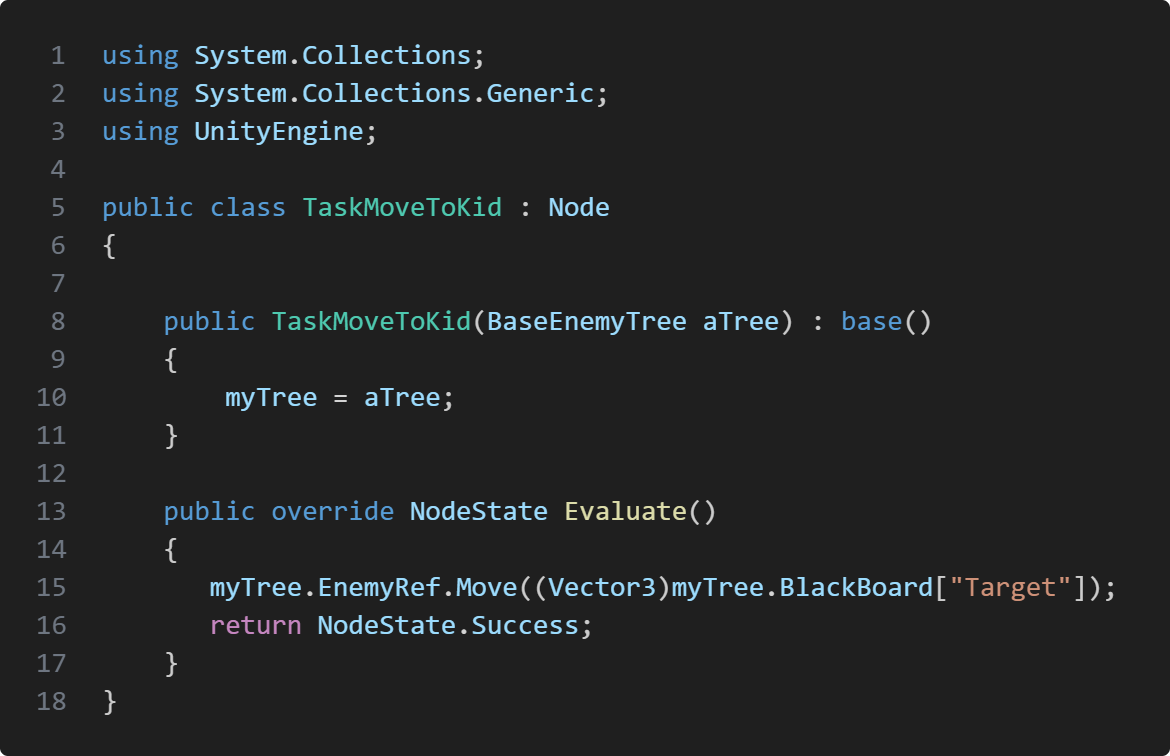
Node
Nodeis an abstract class that other behaviour inherits from. Each Node will have the reference to the tree that uses the node but the nodes can also have more child node to make complicated AI behaviour which is also why the nodes need states so we can manage what happens if the node fails, succeeds or is running.The node TaskMoveToKid is a node that we use in all of the behaviour trees which get's initialized in the SetupTree() function. If we want to make a more complicated behaviour tree.The Evaluate() function is the behaviour itself, where we get the function from our enemy reference.
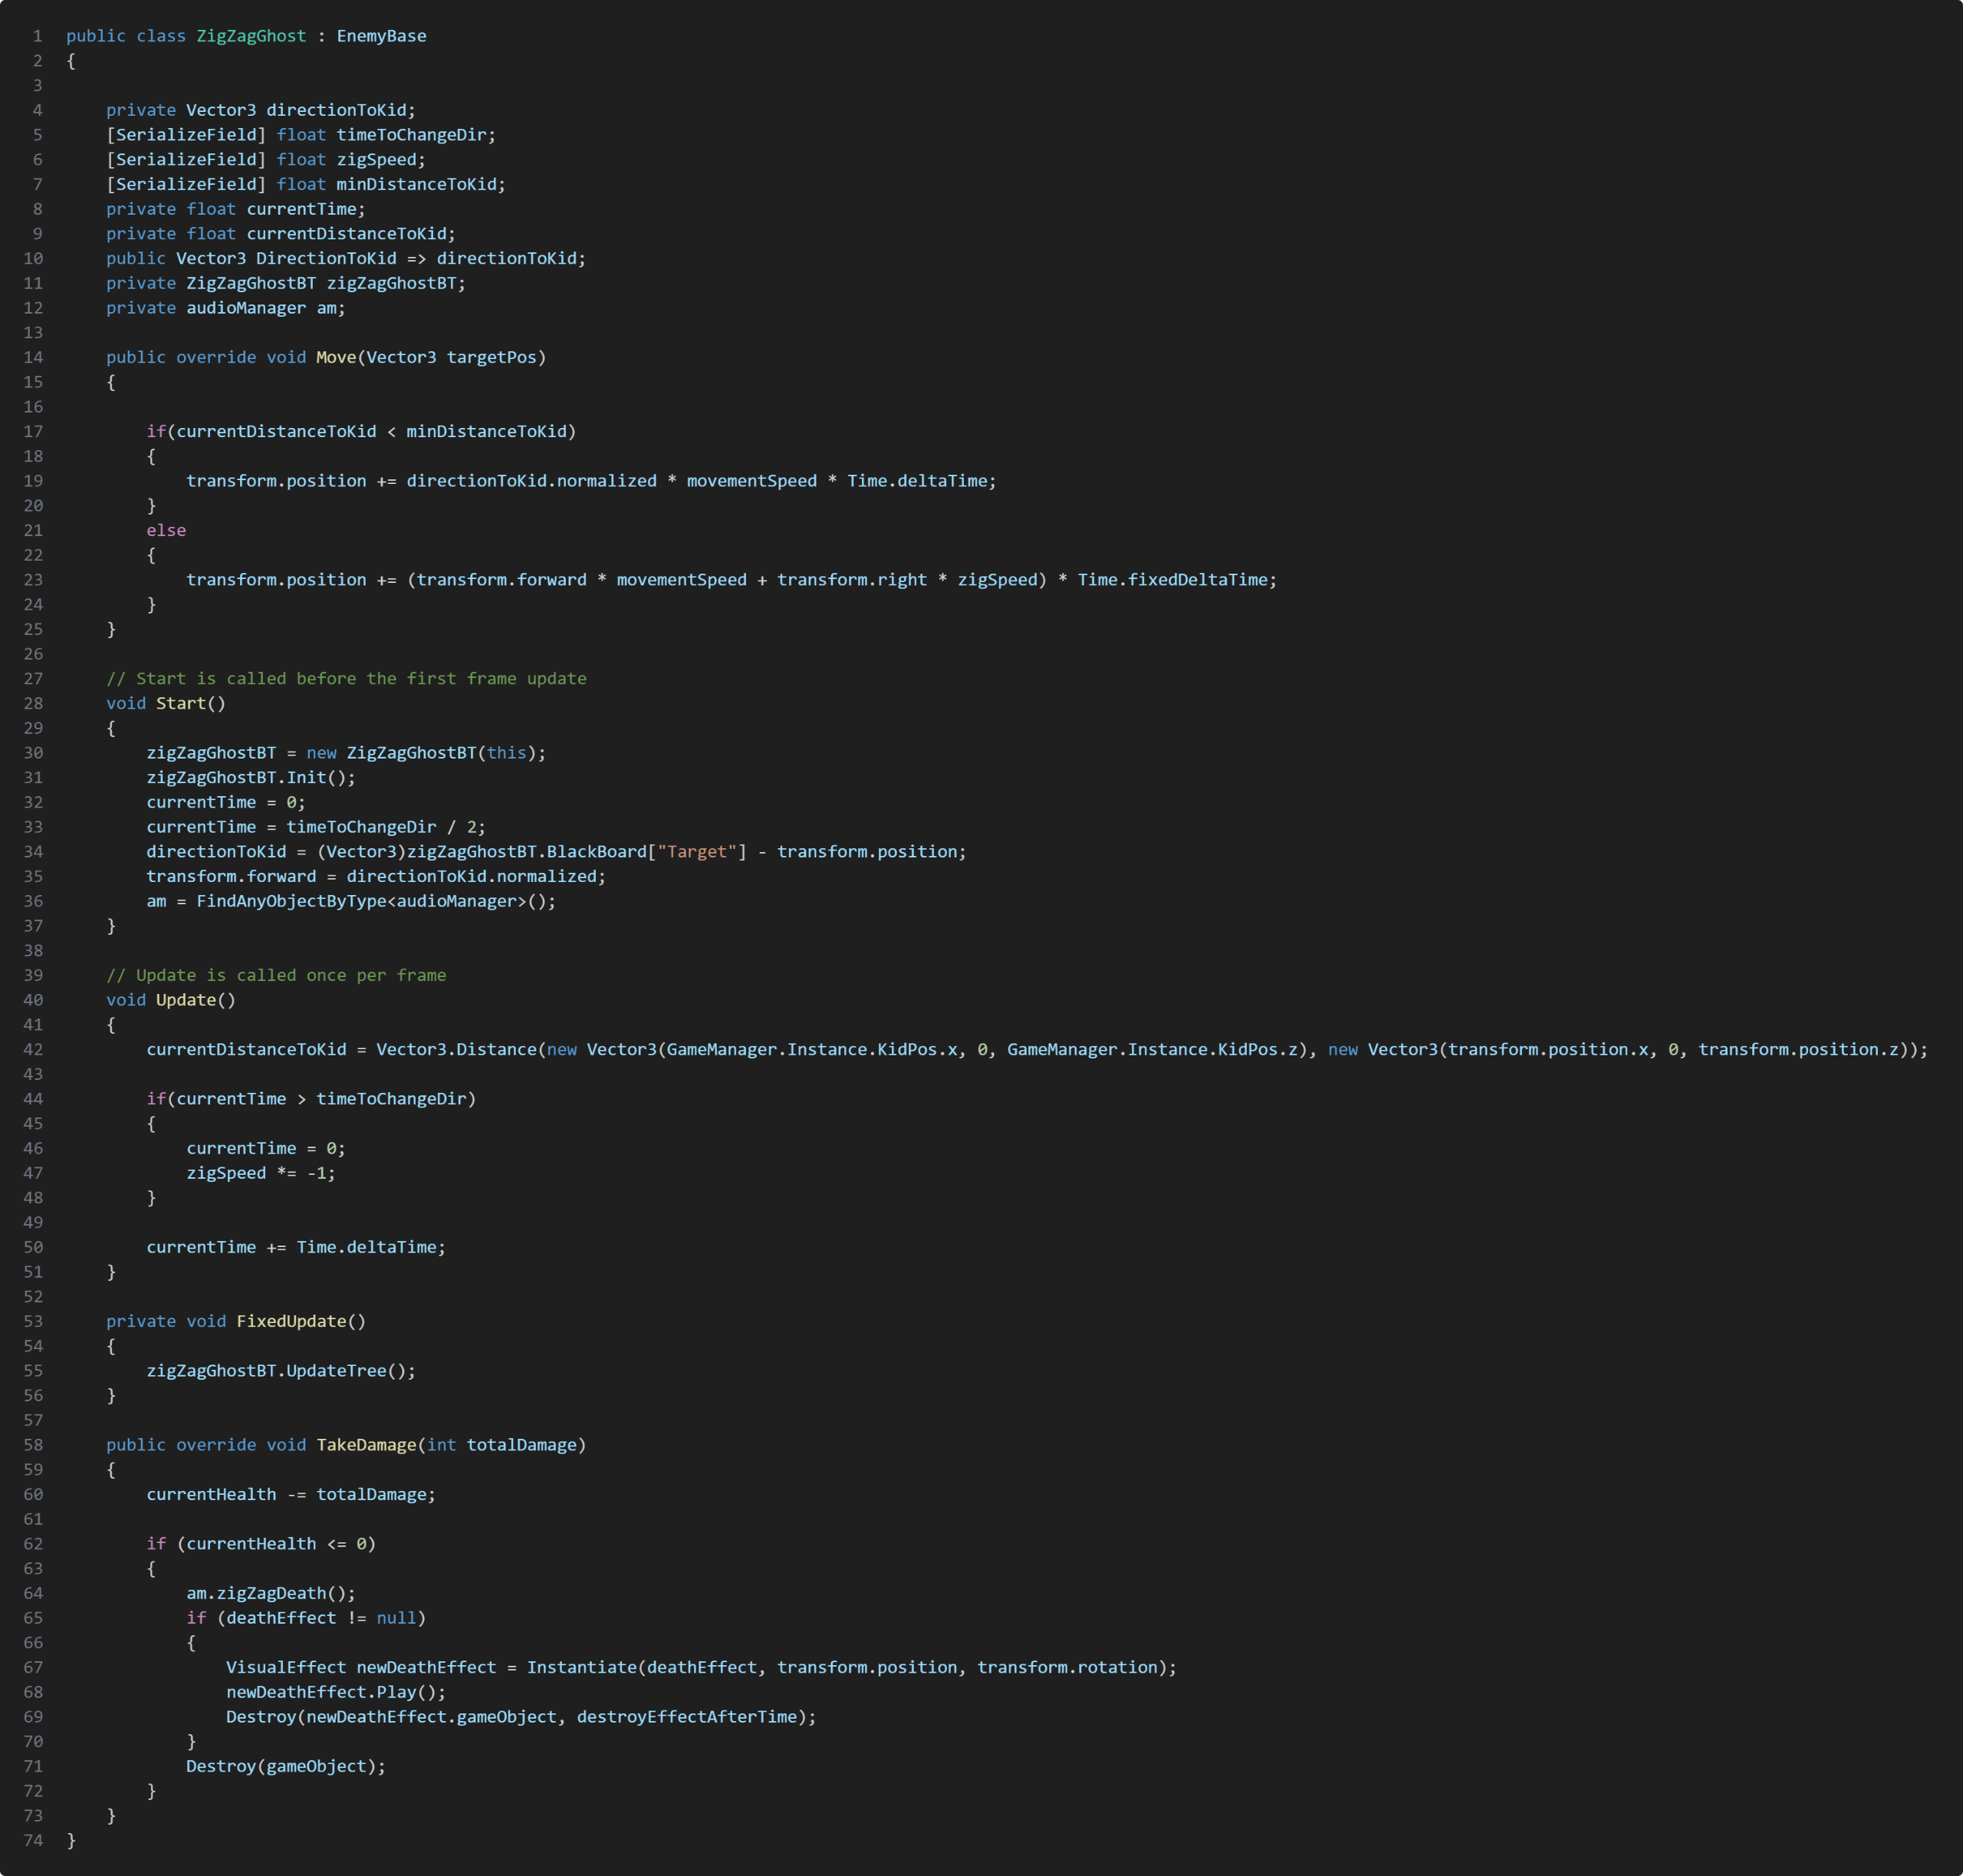
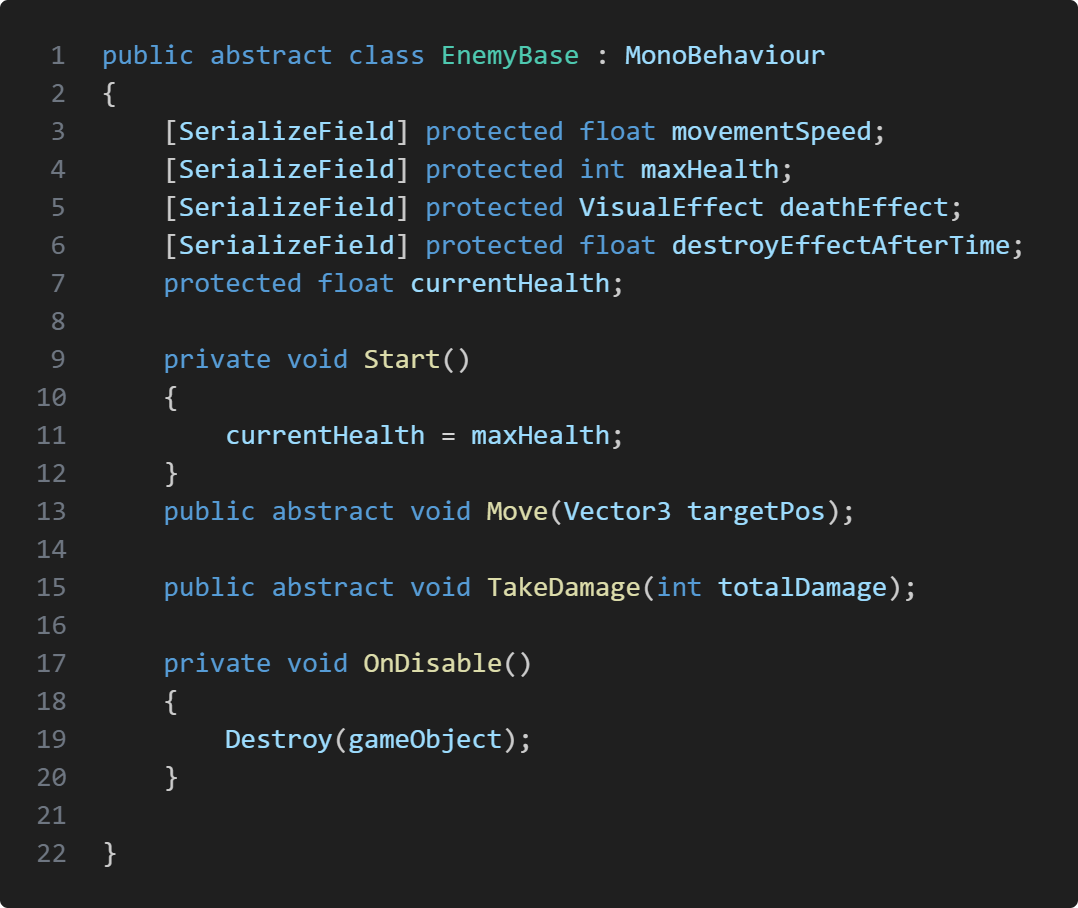
Enemies
In knightmare night we have 3 different enemy type which inherits from the base enemy class EnemyBase. Those enemy types are Mare, Ghost and ZigZagGhost. All of the enemies behaviour can get damaged and killed by the player and they have some features that differentiate them.The Ghost and ZigZagGhost enemy is very similar to eachother. They both die in one hit but they have different moving pattern. The ghost is our simples enemy to defeat. It's slow and moves in a straigth line but it has a fast spawn rate which is meant to overwhelm the player.The ZigZagGhost is faster than the Ghost and has a tricky movement pattern going left to right making it difficult to hit by throwing the shield, but has a lower spawn rate than the Ghost.Mare is the tank of the enemy. It's super slow and has the same movement pattern as the Ghost but can take multiple hit. If the player damages it once the Mare will be stunned for a short duration.
Take Aways
Knightmare night was my first game project where I got to work with other discipline. I learned a lot how important communication is which I'm planning to better
Information
Engine: Unity
Language: C#
Duration: 4 Weeks
Version Control: Perforce
Sound Engine: FMOD
Contributions
Player character
Movement system
Interaction system
Implementation of Animation
Implementation of Sounds
About Project
Codename Mansion a short point and click, horror, puzzle game where the main protagonist goes to his uncle to find a disturbing discovery.
Player Commands
For this project I decided to use command pattern for player action. The reason why I wanted to use the command pattern is because I thought it was the most fitting to manage player controller and action. This way if the player want to pick up an item but needs to walk to it. I can create walk task and grab task which I put into a queue that stores task and execute them. We also have drag and drop mechanic where the player can use items to interact with environment. Some items needs to be close to the interactable object to execute the task, meanwhile our combat mechanic which is also a drag and drop the player can shoot from range without having to walk close to the interactable object in the world. The command pattern makes it easy to customize and manage what should be done and in what order.
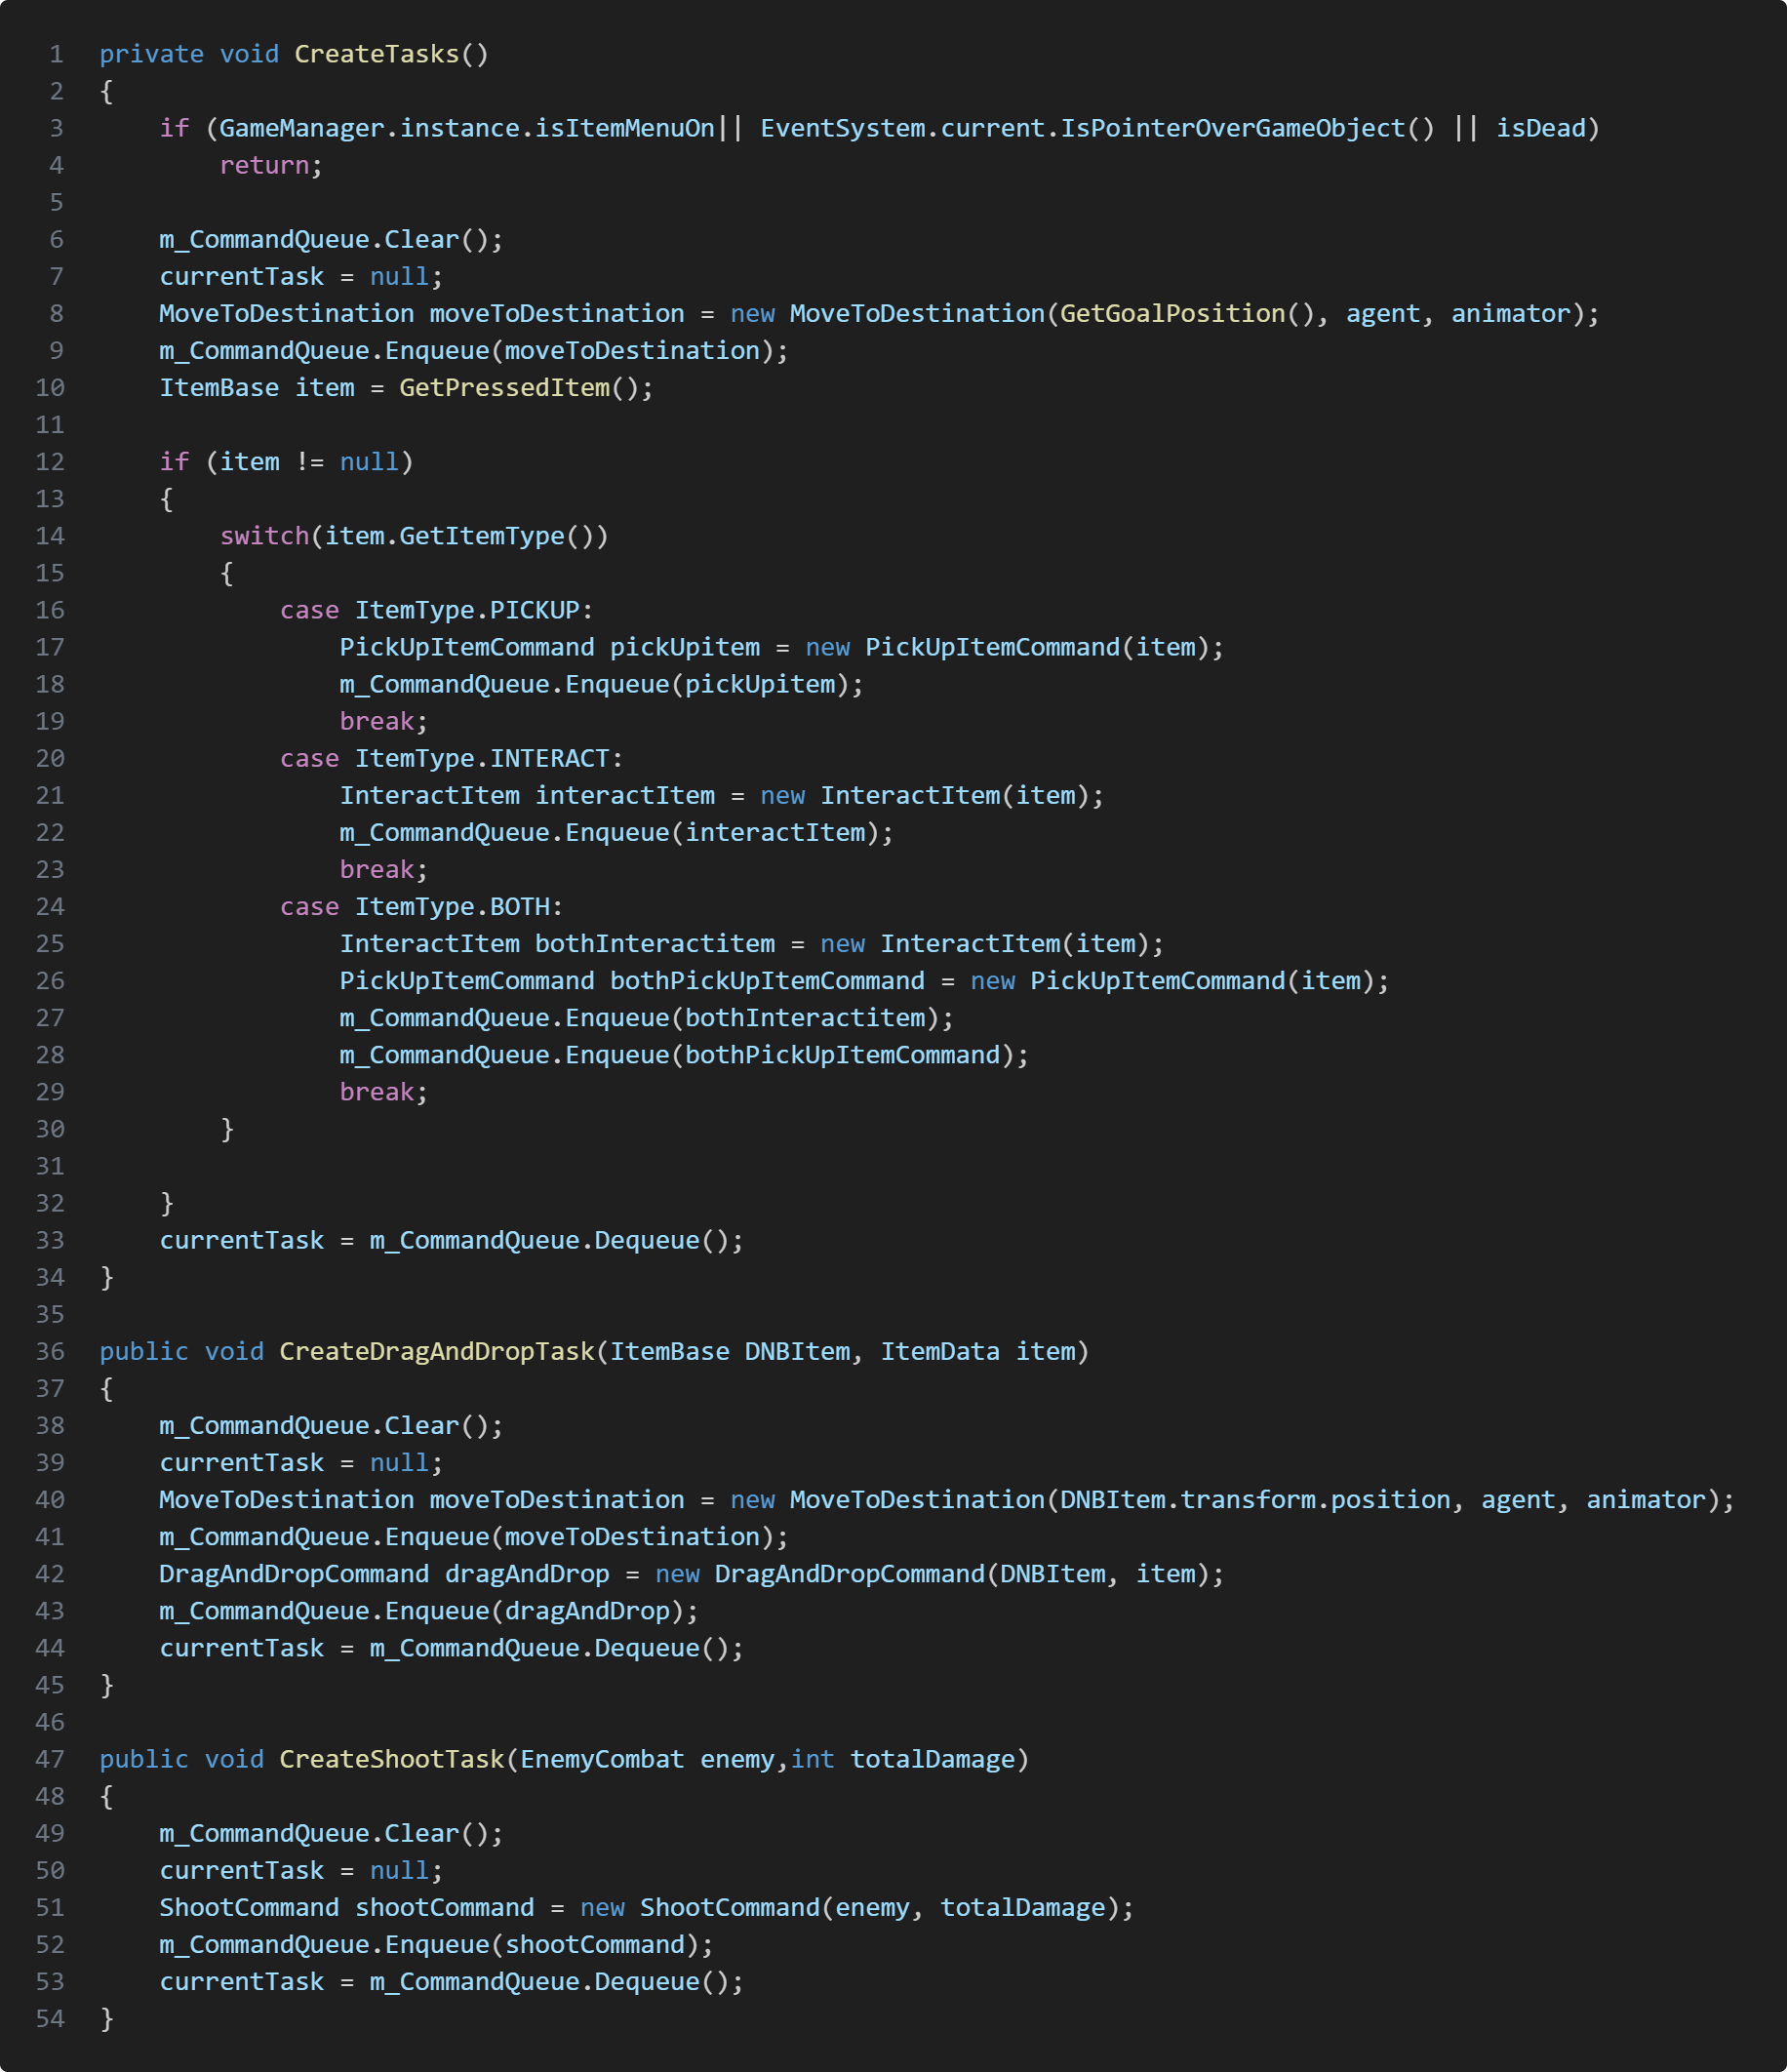
Here are the three different function to create our commands. CreateTasks gets called on mouse presses, these commands are usually task where the player interacts with world objects like picking up objects, investigating or both. Depending on item type we create the represented command and add it to the queue.
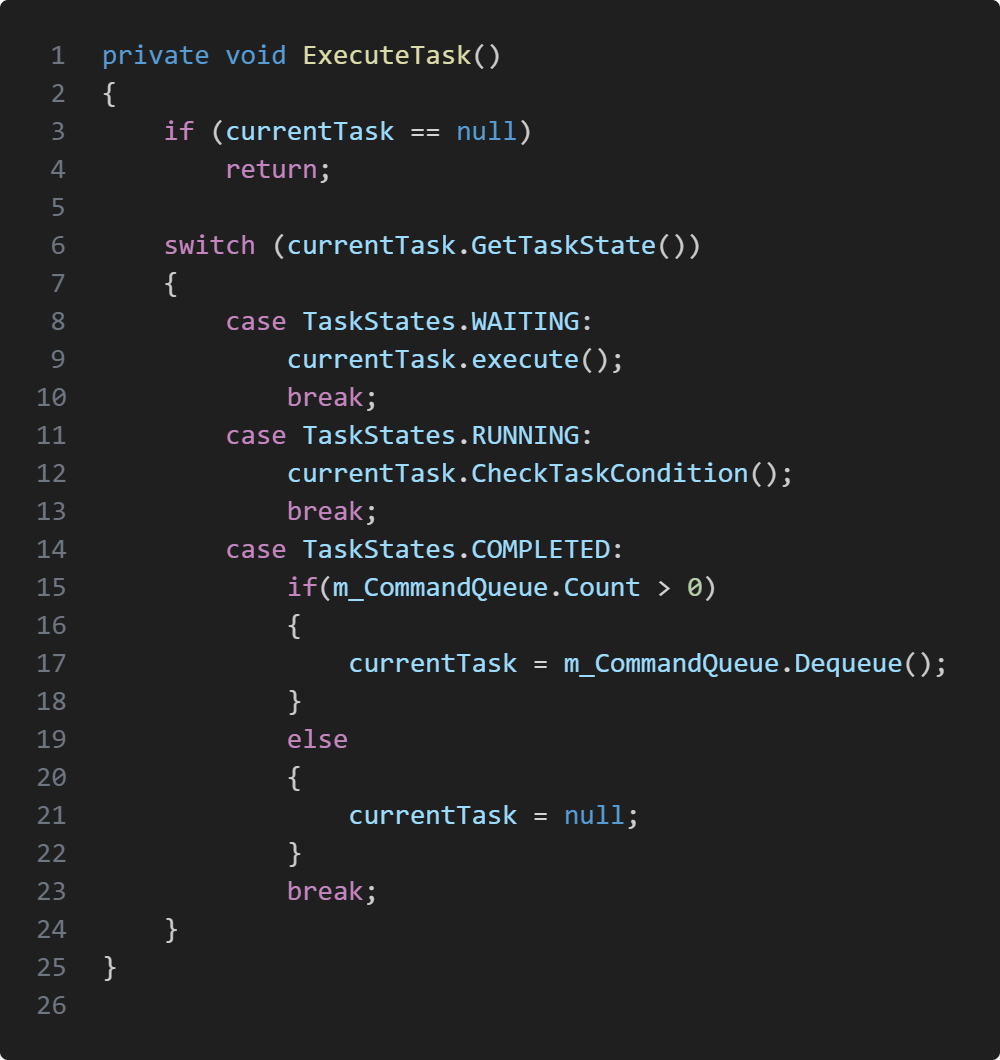
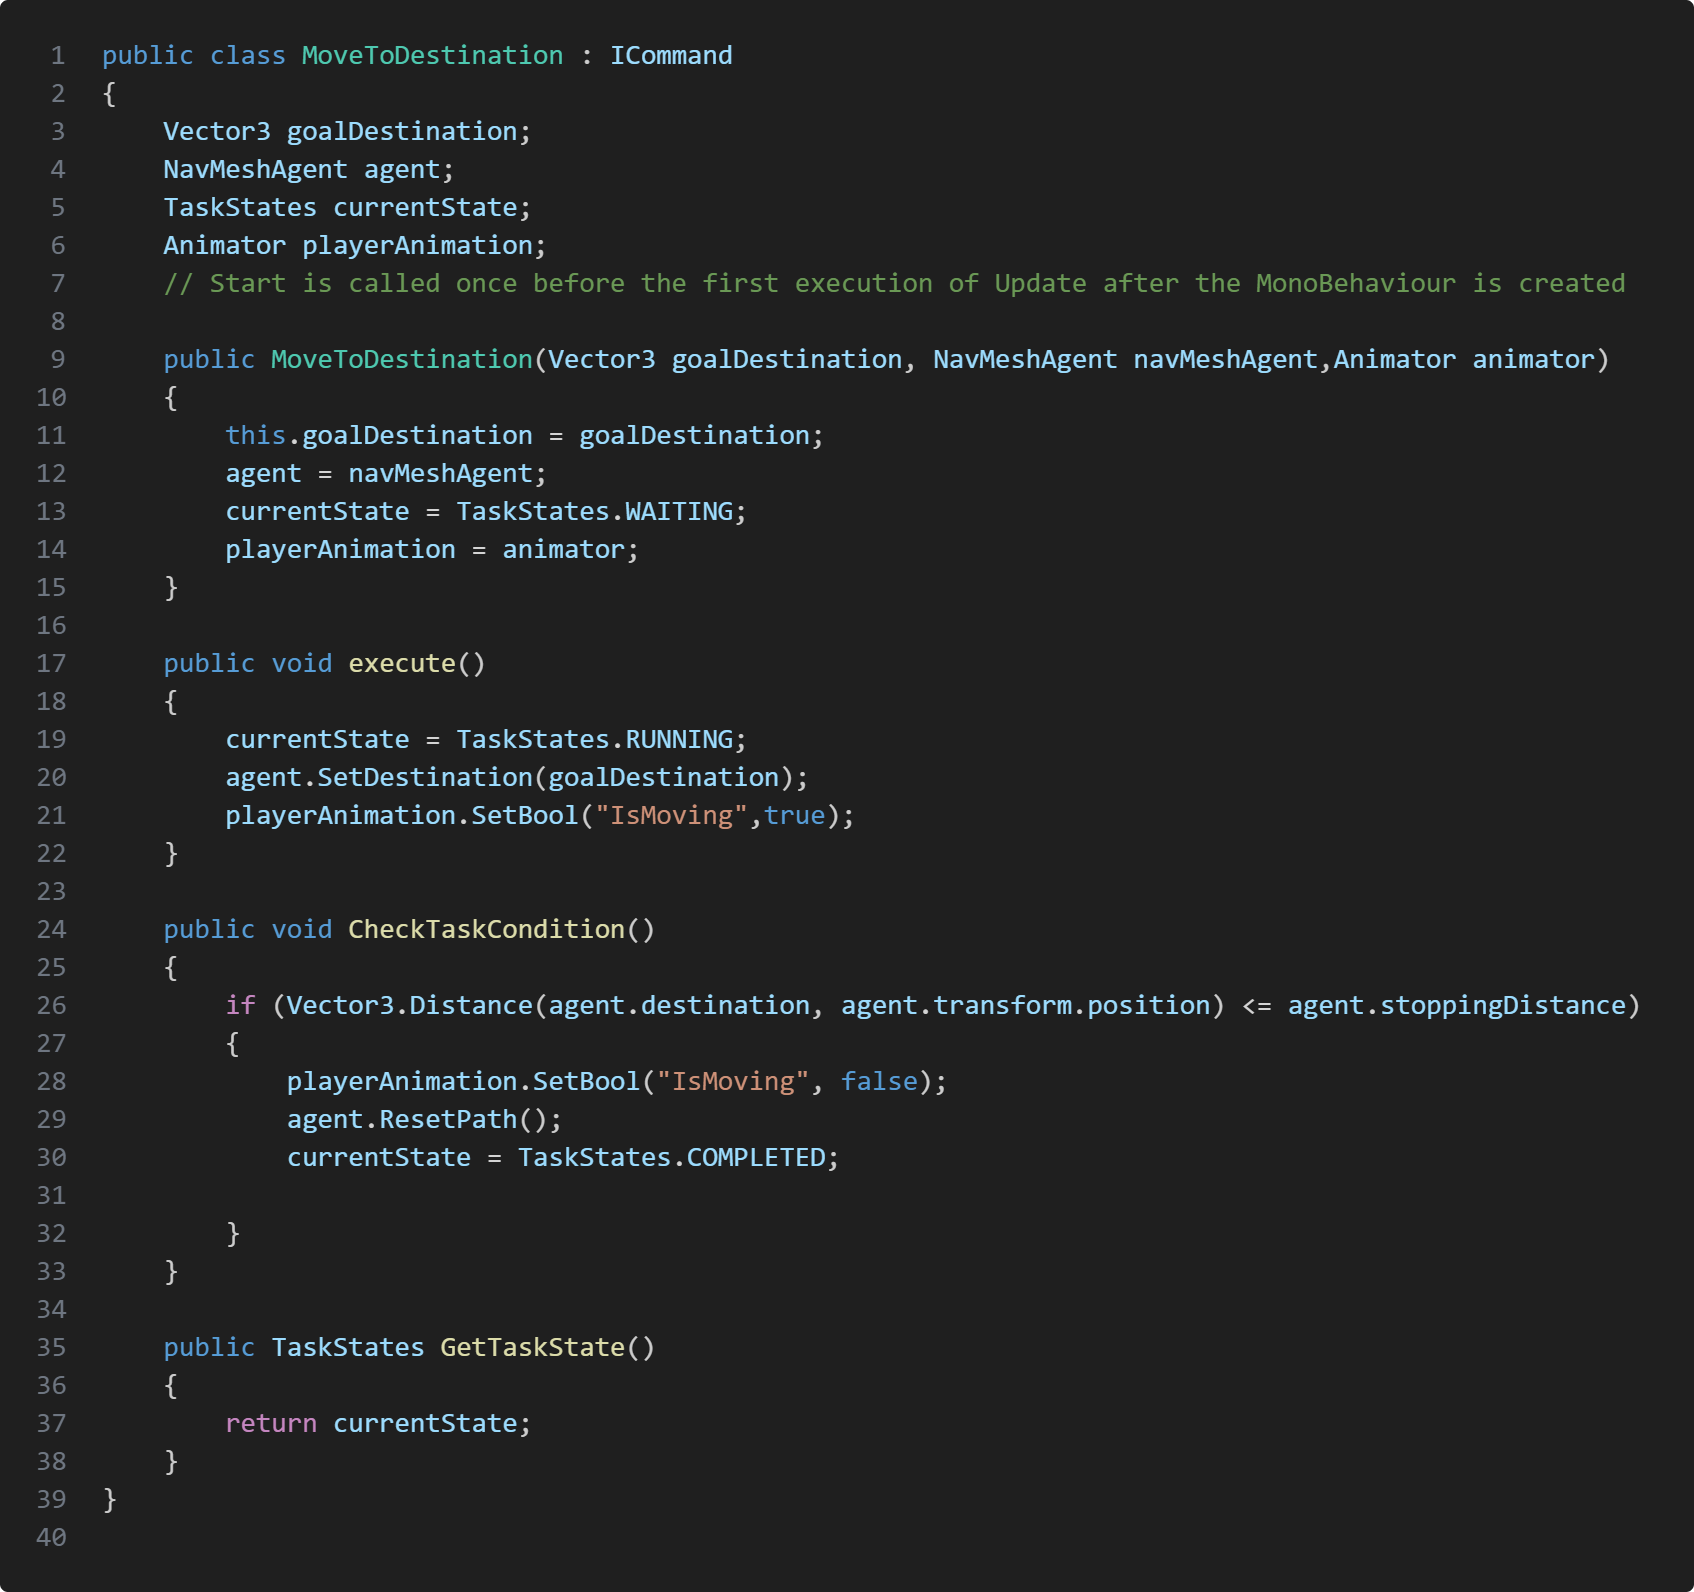
CreateDragAndDropTask gets called when we want to use an item. We create the MoveToDestinationcommand and also DragAndDropCommand command and later add them to the queue.The CreateShootTask works very similar to drag and drop, the only difference is we don't create a MoveToDestination command, but instead create a ShootCommand.Each task class has the interface ICommand, the interface has 3 functions which are execute(), GetTaskState() and CheckTaskCondition(). execute() as the name says, performs the command, each command also has a state, this is to manage when the task is done so we can execute the next command in queue. ExecuteTask is somewhat similar to a state machine. Every frame after we've executed the command we check if the command has completed it's task. If not the task state will be on RUNNING, otherwise we set the state to completed and go to next command.
Item Interactions
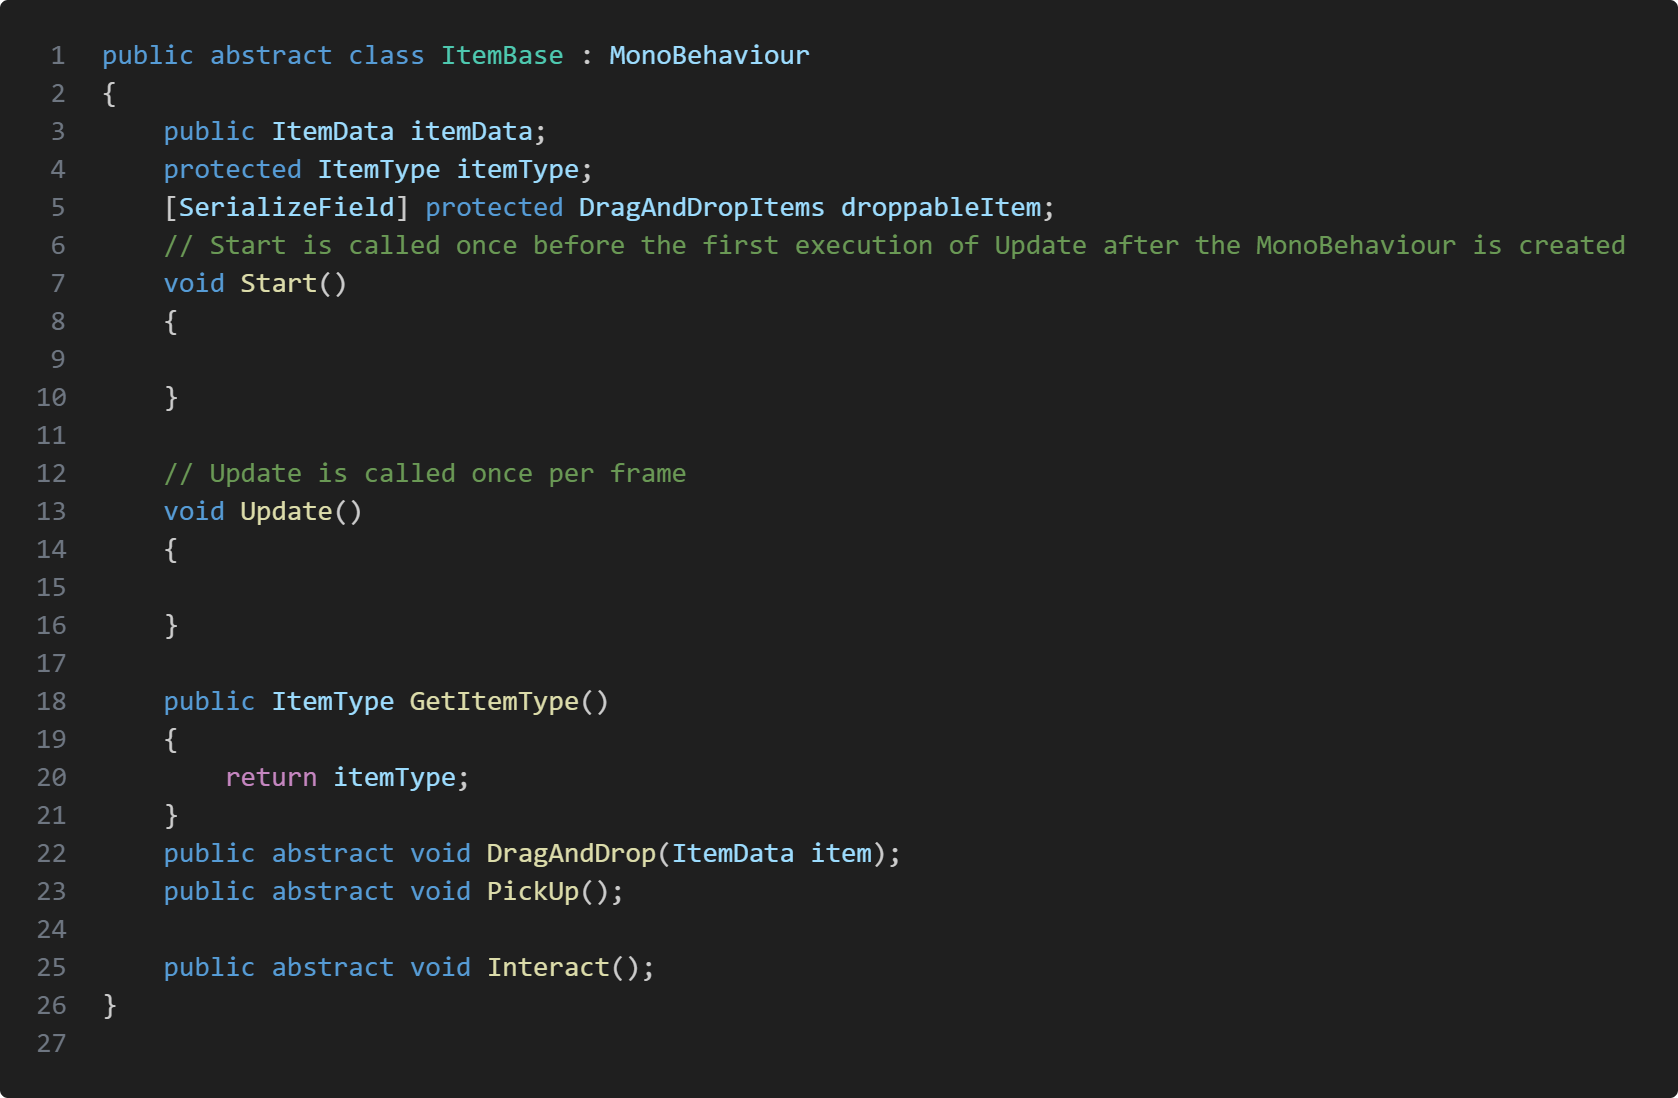
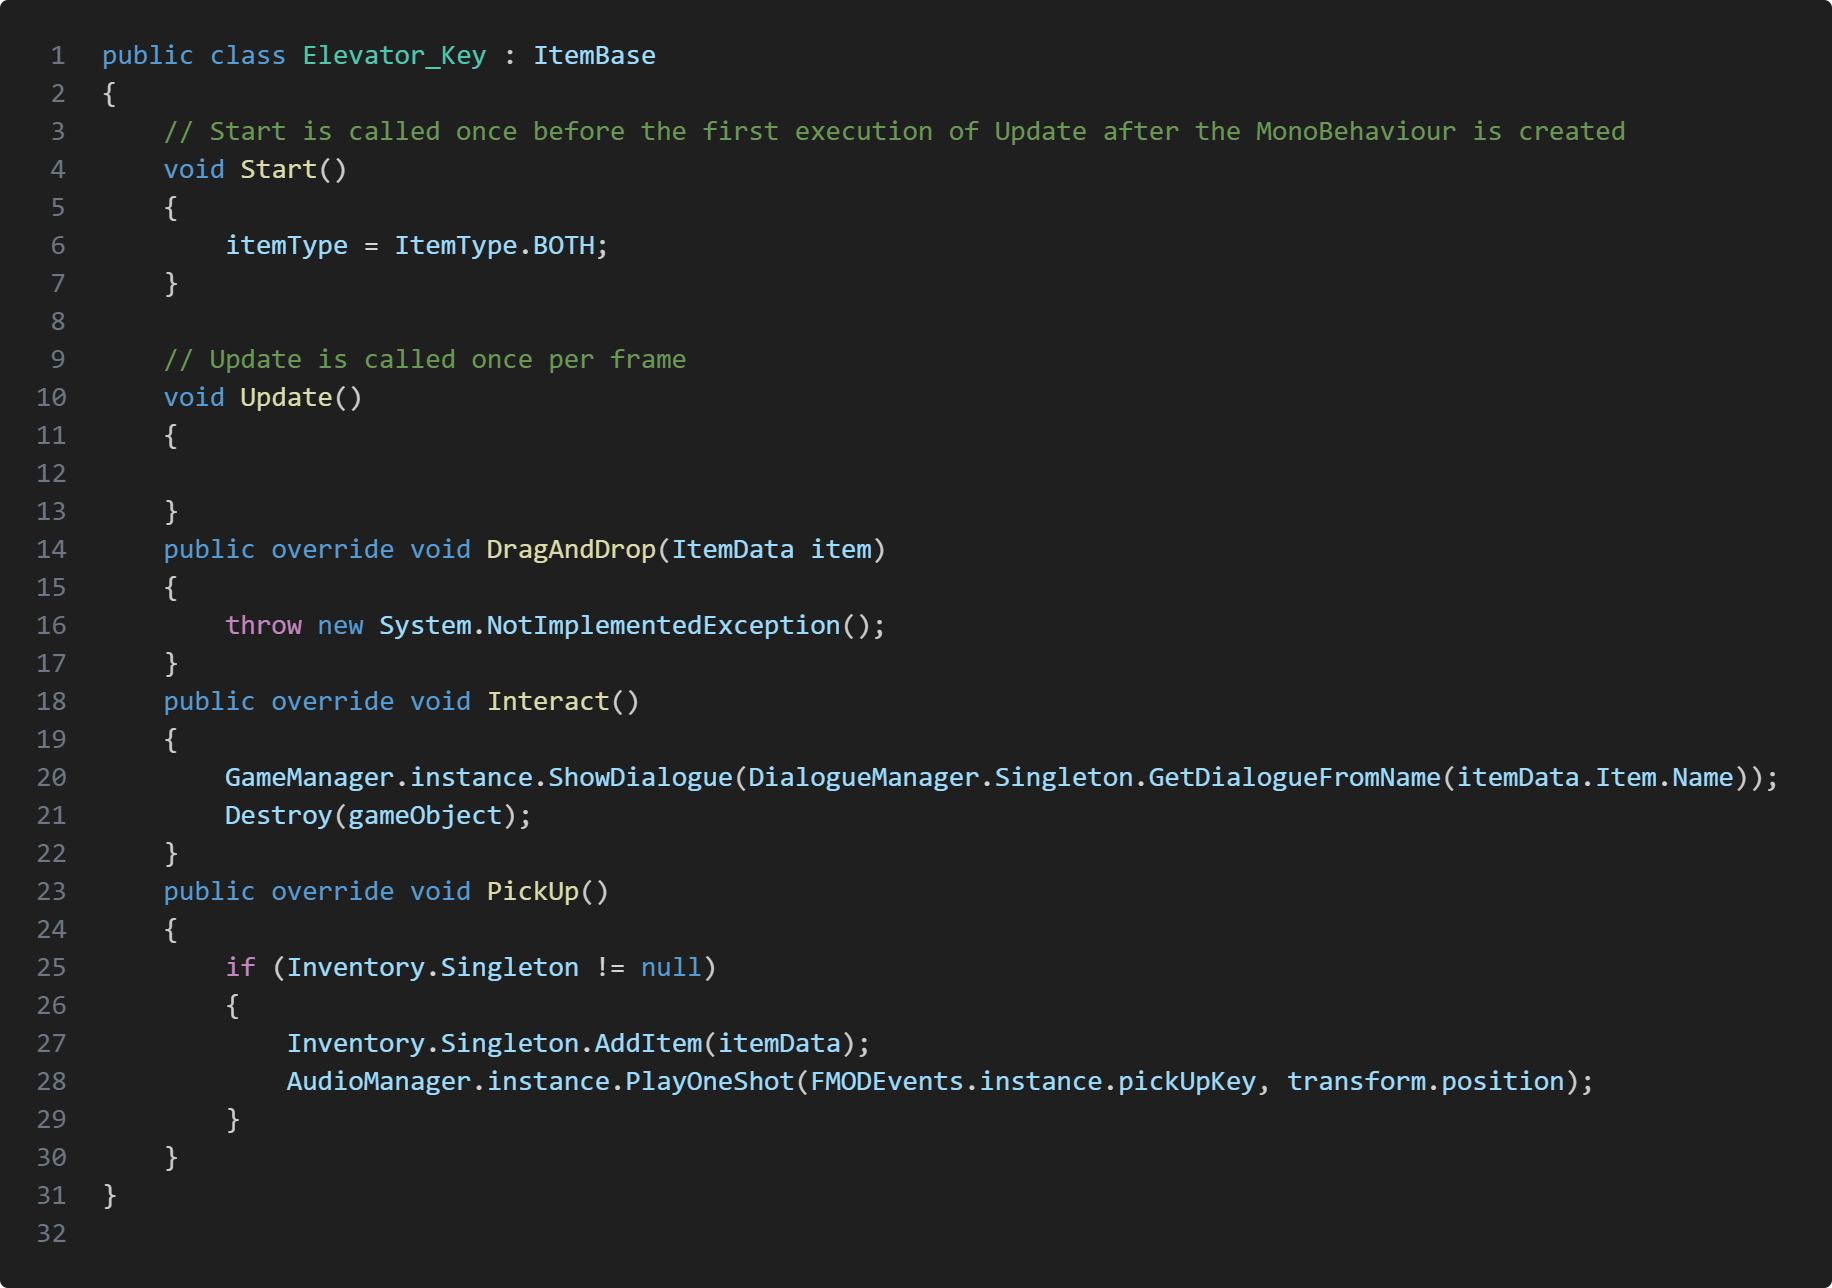
I created an abstract base class for items to inherit. Each item has a type, which manages if the item is just pickup, interactable both. For example our ammo box are just pickup, mean while a key is both a pickup and interactable where when we pickup the key we also interact with it which shows up a dialogue. Each item also has an itemData which stores crucial information, like item name, description, if the item can combine, what items can be combine with and what the result leads. Item type is also how we manage what command to queue, for pickup item we create command to pick up item, for interact item type we create command to interact with the item and if the item type is both interact and pickup we create both commands.
Take Aways
In this project it was my first time attempting to use the command pattern. I really like how the design pattern works and it was exactly what I was looking for, but there are several areas that can be improved. One thing I would change when it came to items would be that instead of having a base class for items I would rather use interface's. One big downside with my base item class is everything is drag and droppable, pickup able and interactable. How we avoided was to have item types and leave functions empty. With interface we can avoid this, we could instead create IPickupAble, IDragAndDroppable, IInteractable and so on. this way we don't need to have an Item type and can call the interface's function instead. I could also improve naming convention, since some function names are not consistent with the code convention we picked. Otherwise this project taught me a lot about inheritance, interfaces and command pattern.
Information
Engine: Unreal Engine
Language: C++
Duration: 7 Weeks
Version Control: Perforce
Contributions
Player character, controls and mechanics
Robot Claw
Implementations of animations
Procedural animation
Physics
Perforce master
About Project
Asteroid Explorer is a physics based mining game where the player have to swing their pickaxe by moving the mouse around to gather orbs and deposit to the airship to escape. The physics mechanics was inspired from R.E.P.O's way of holding/using items. We used Unreal Engine's physics handle tool to replicate holding items with physics and interaction with the environment.
Player Controller
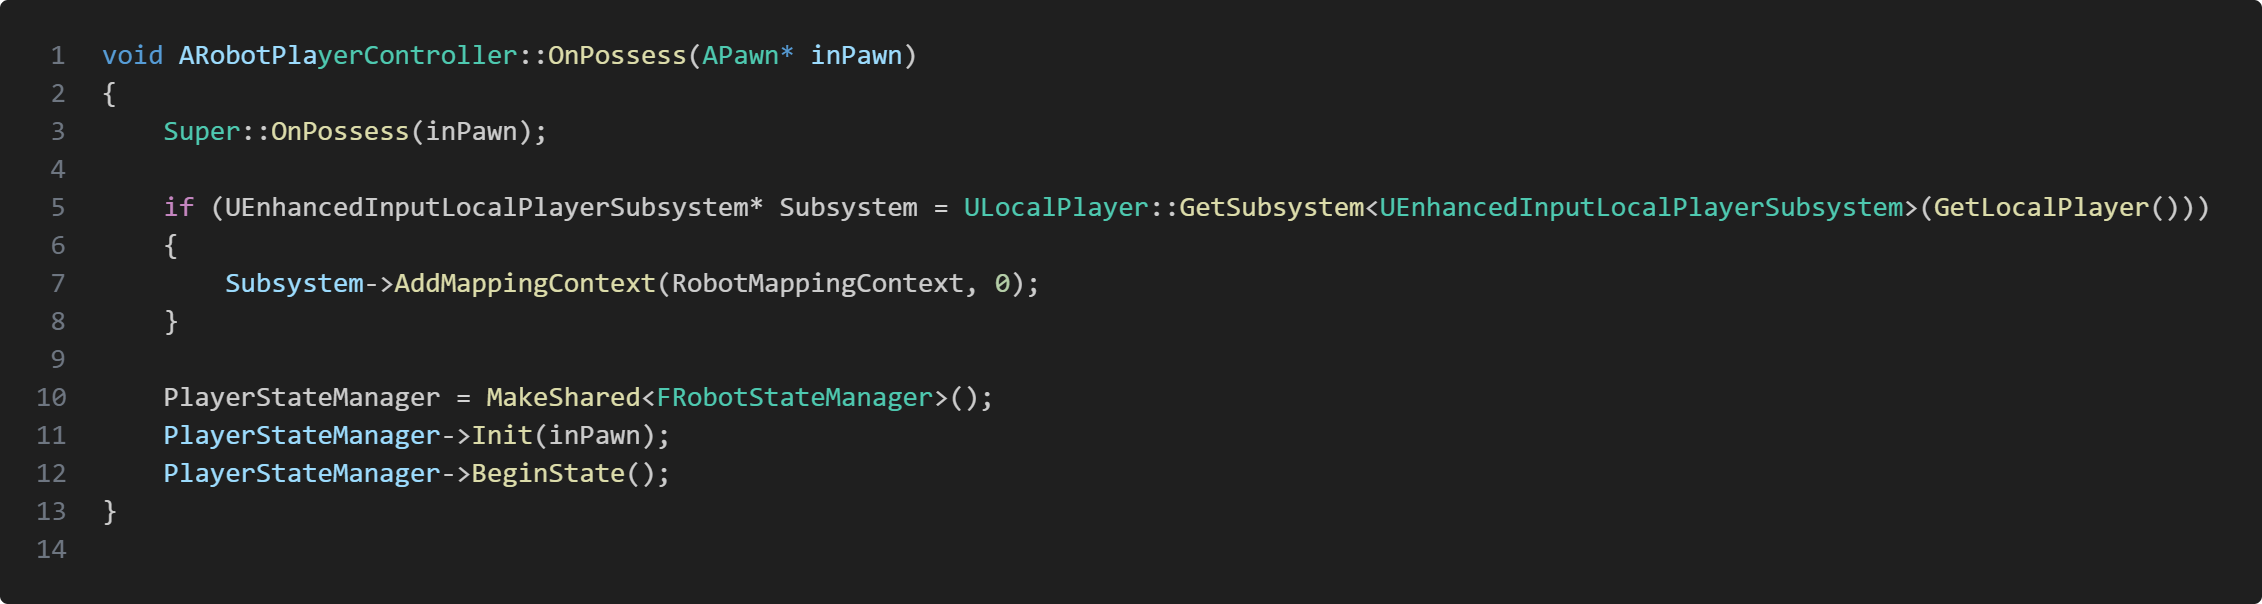
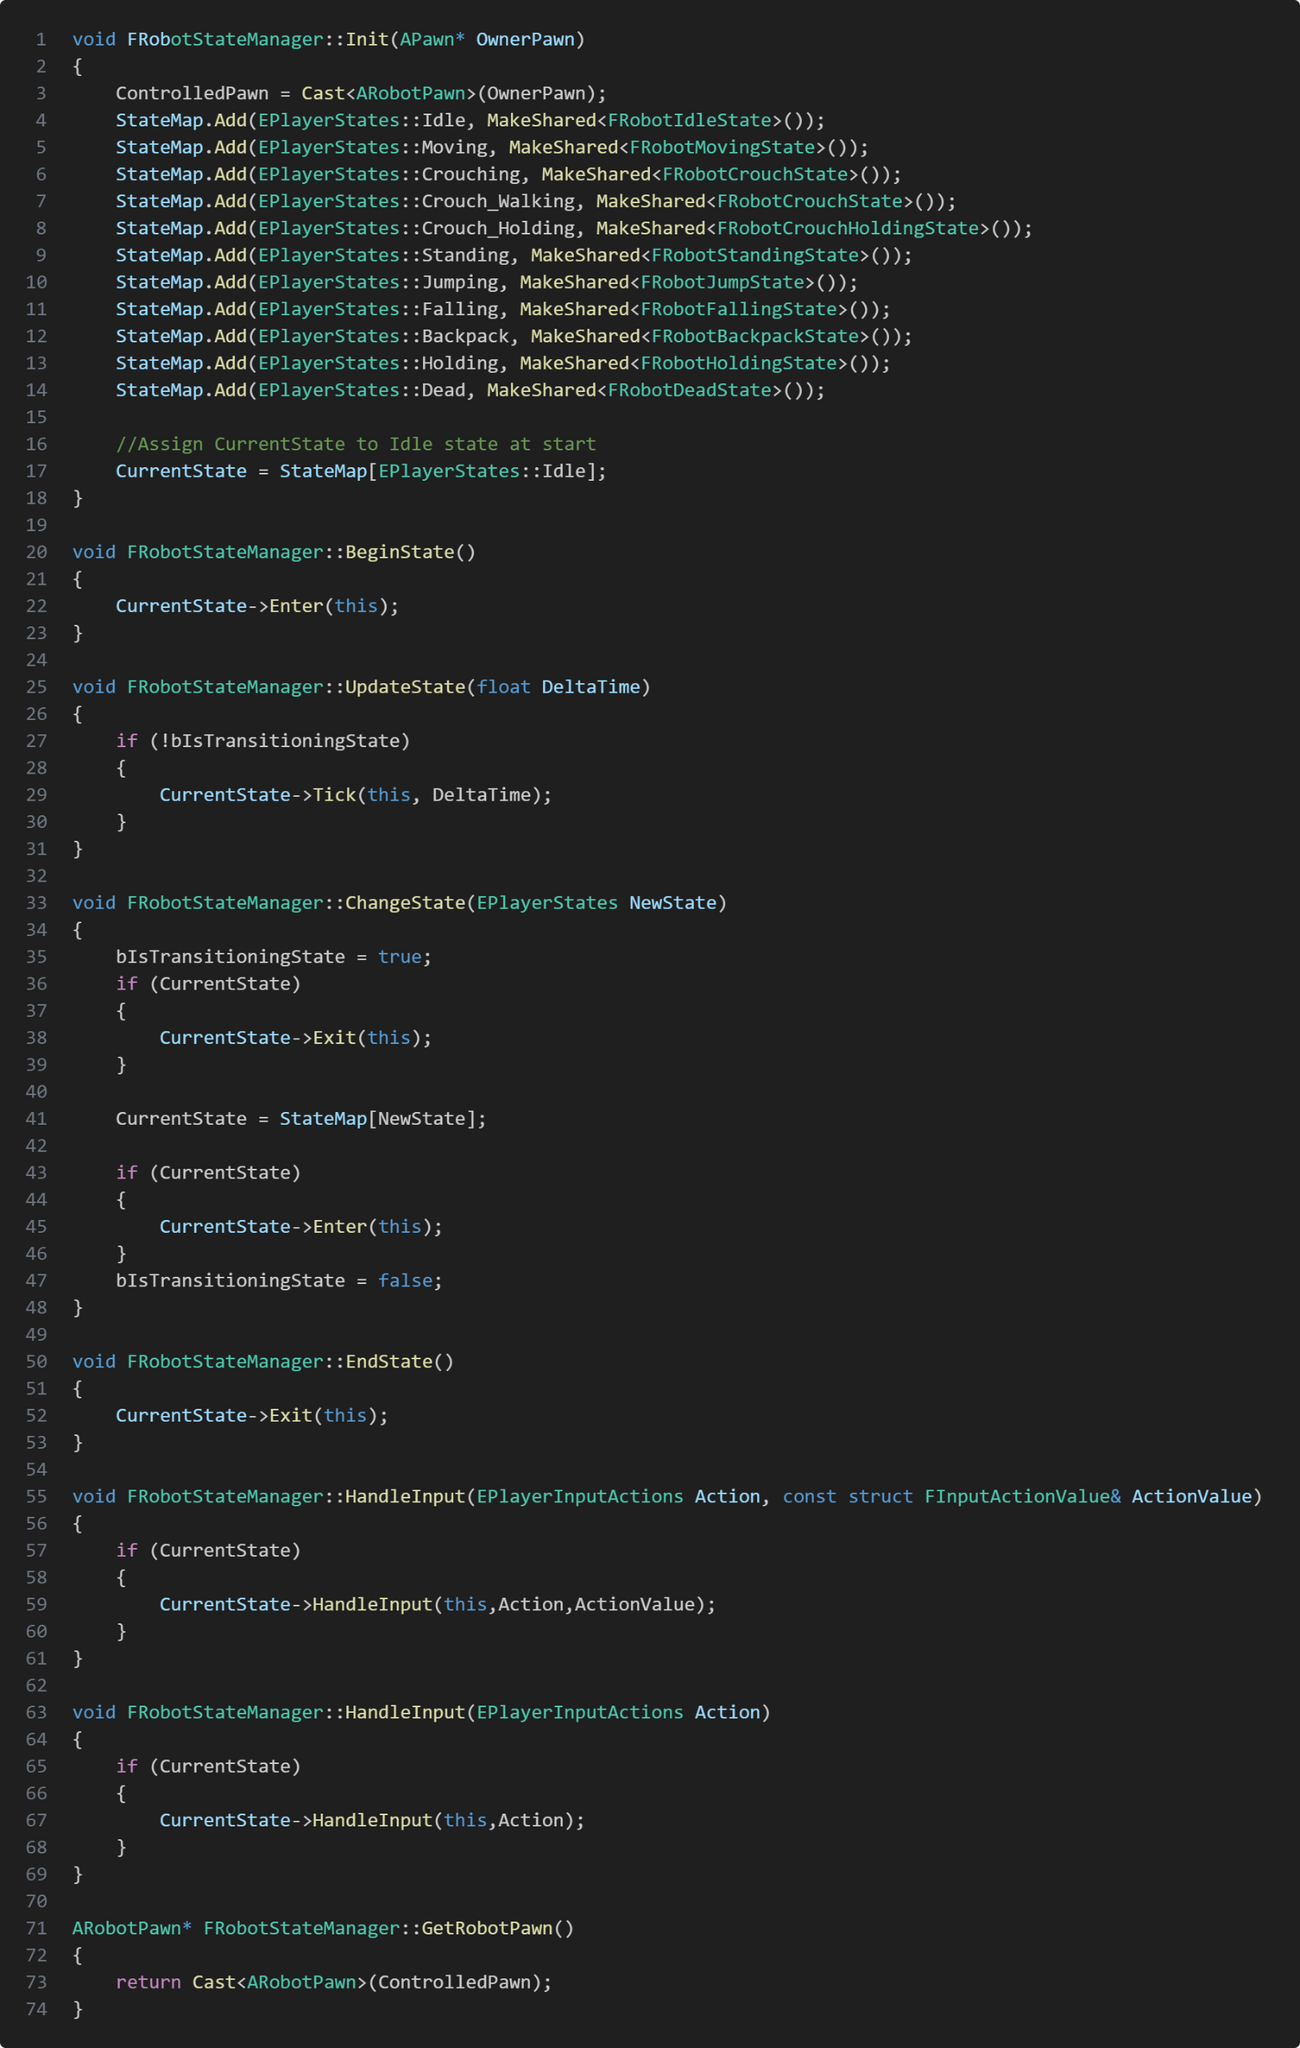
The player character uses a state machine to manage animations, sounds, vfx and which actions are allowed to use depending on the current state. The state machine is managed by our custom player controller script ARobotPlayerController which inherits from the class APlayerController. When we possess our pawn we initialize our state machine and the character starts in the Idle stateWhen the character gets possessed by our custom controller we start running our state machine, adding all player states into a state map in the state machine and entering the first state. We wanted to manage which actions are allowed and which are not depending on the state so each player state gets an EPlayerInputAction, which is an enum and the states checks if the action exists.
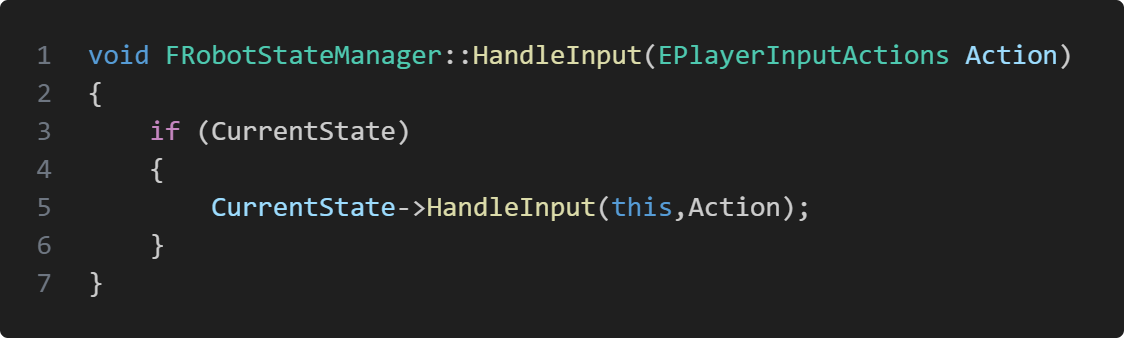
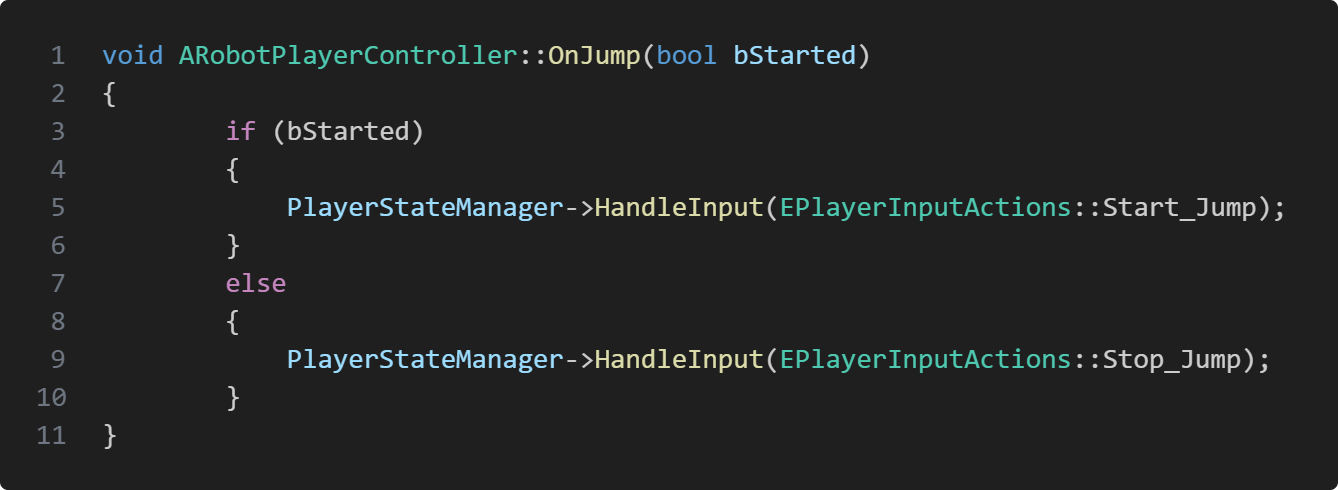
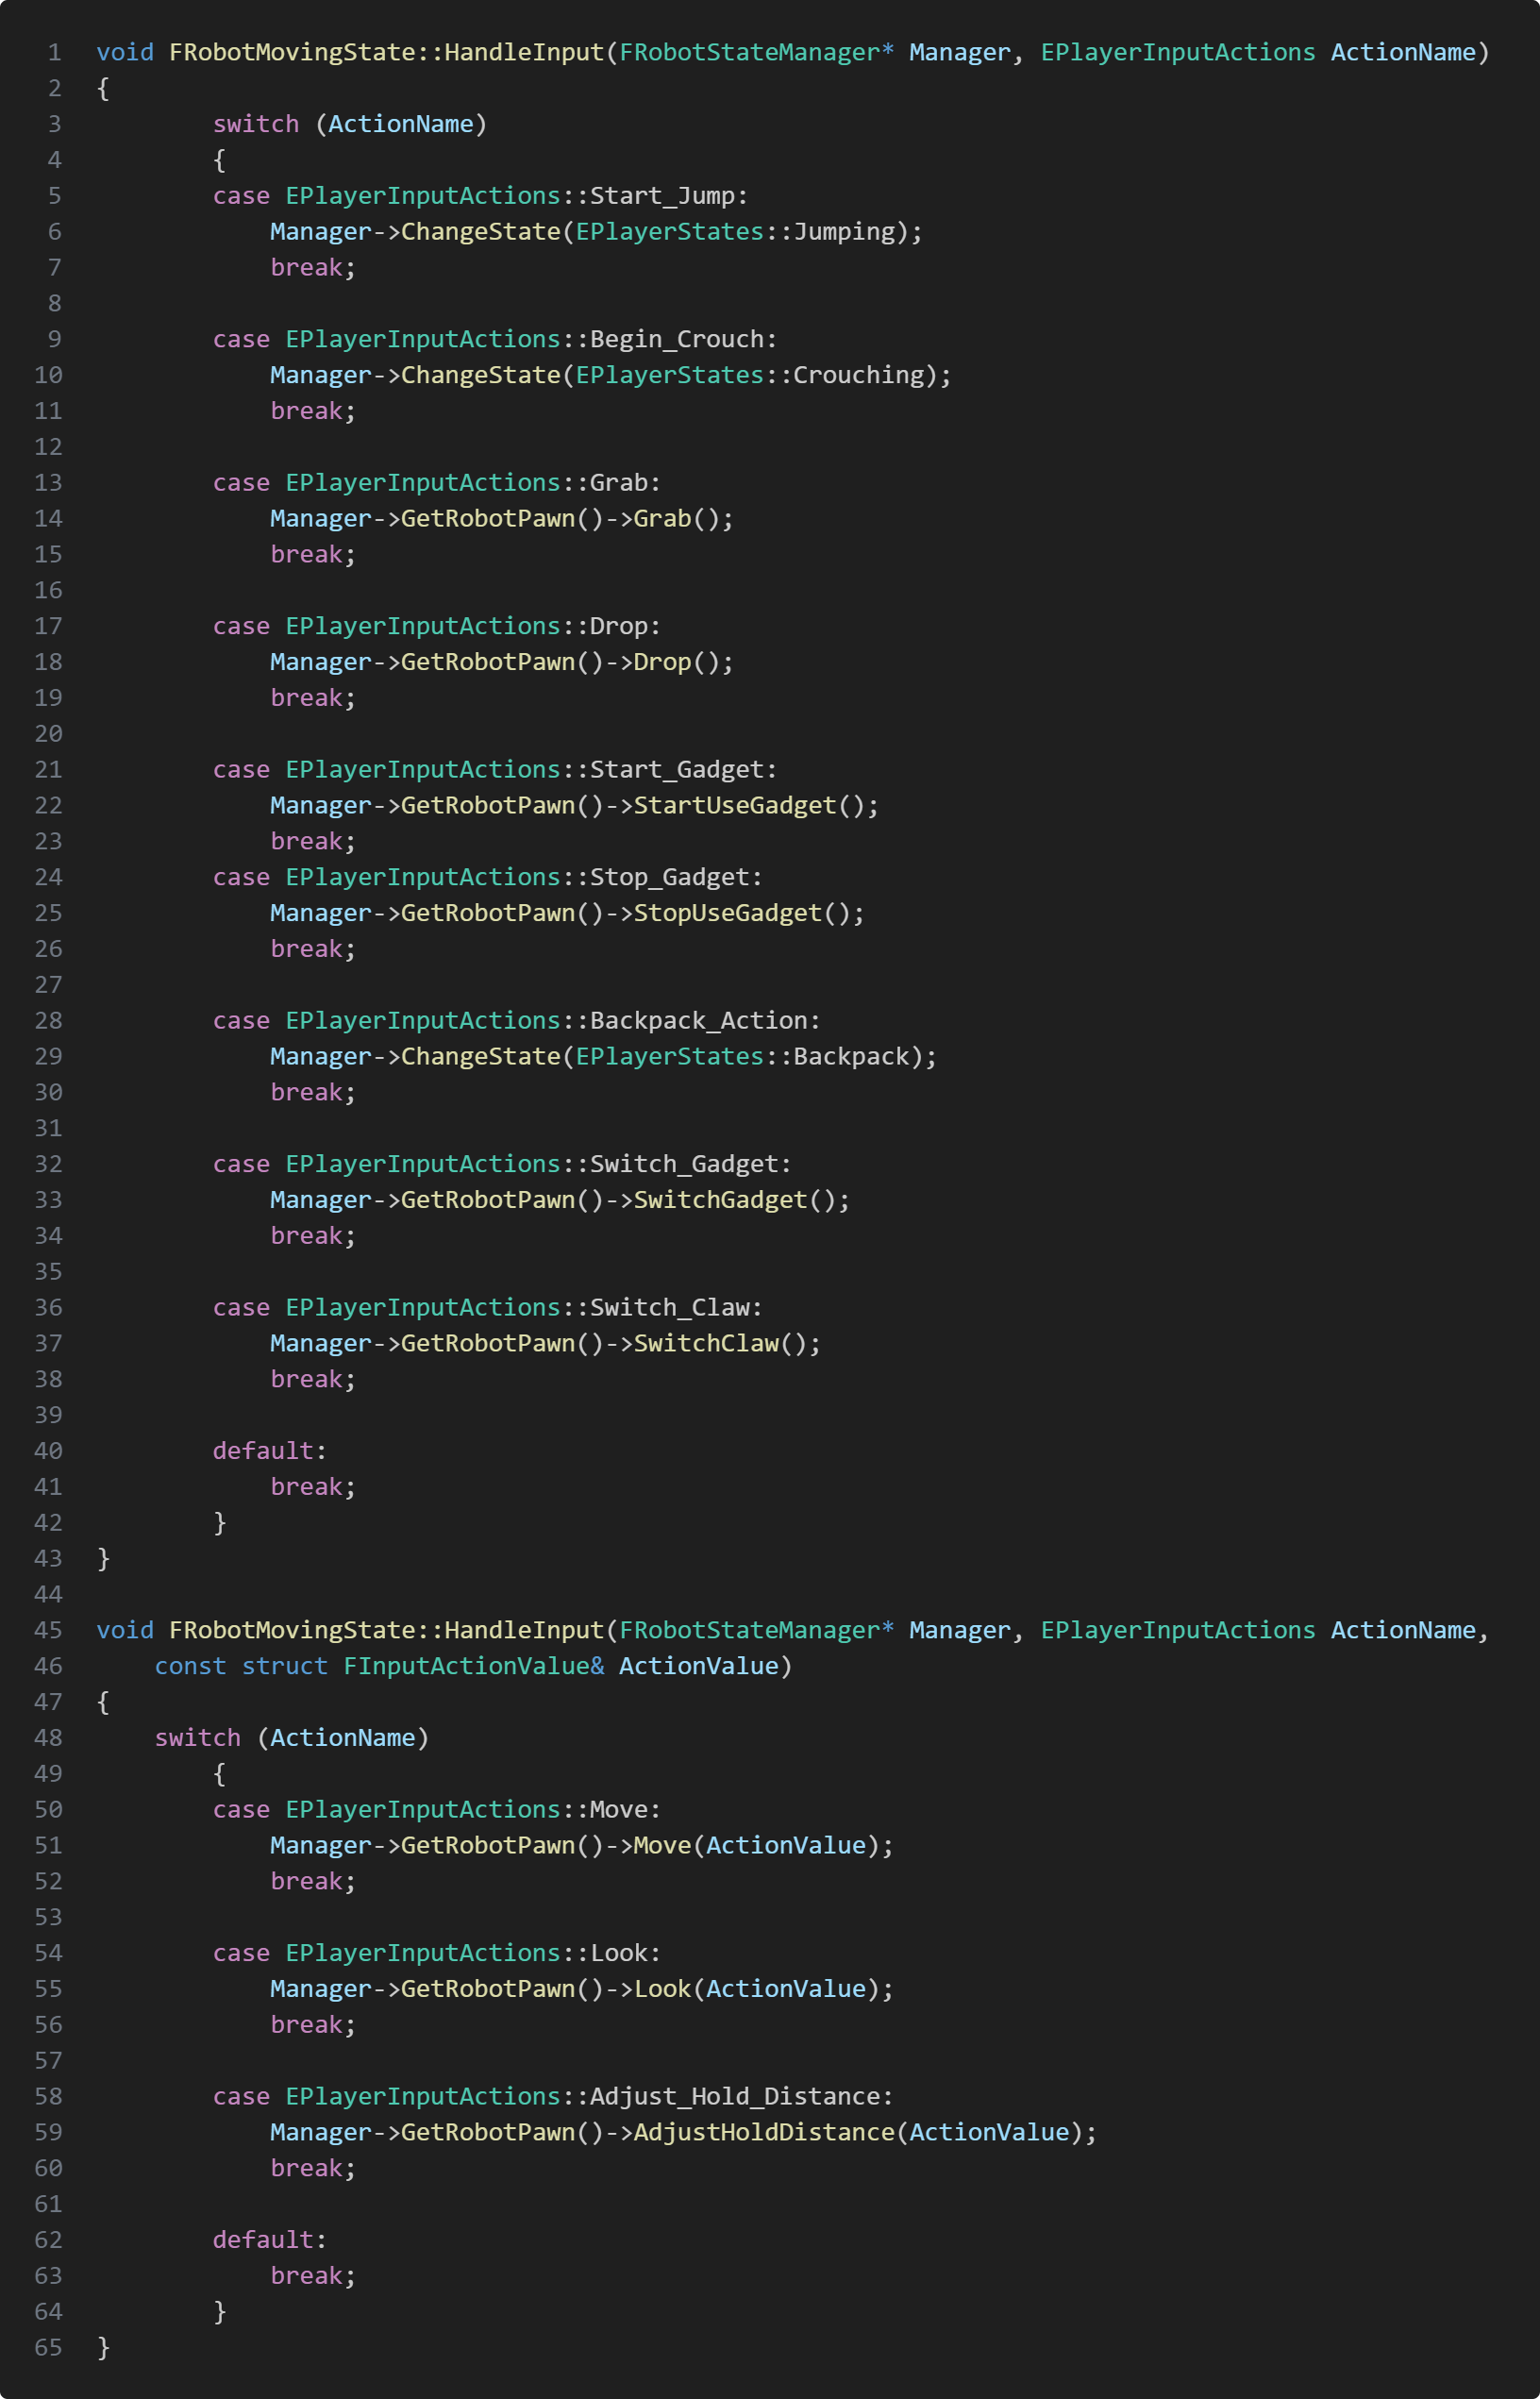
Each state has two HandleInput, where the difference is one takes FInputActionValue which are values that changes depending on input. The EPlayerInputActions gets sent from the ARobotPlayerController where different input sends different actions. So if the player jumps the player controller calls the state machine's HandleInput function and sends Start_Jump action.The state machine gets the requested action and sends it forward to current state which calls the corresponding function to the action from the player class


Grabbing Object
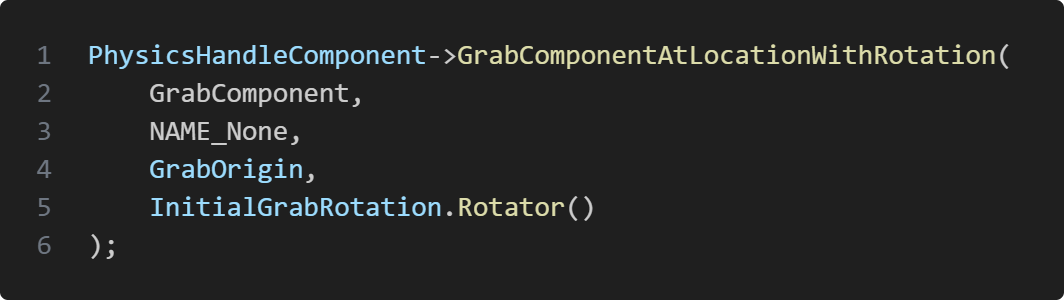
This feature was the most difficult task I had in the whole project. This includes the procedural arm animation and what type of grab it is. In Astroid Explorer we wanted the game to be physics based. This also includes handling grabbed object, to swing when we look around and collide with the environment. What made this even more difficult was having our procedural arm to reach out to the object, but we didn't want it to just grab from the middle we wanted the arm to move where our grab detection hit on the box. Before going deeper into the difficult parts I want to start with how the actual grab function works. To implement physics based grabbing it is very easy in unreal engine thanks to physics handle component. There is already a built in function to grab a component at a specific location with rotation.
You just need to send what component to grab, where to grab and the rotation the component should have. After grabbing, all that's left is updating the position and being able to drop.
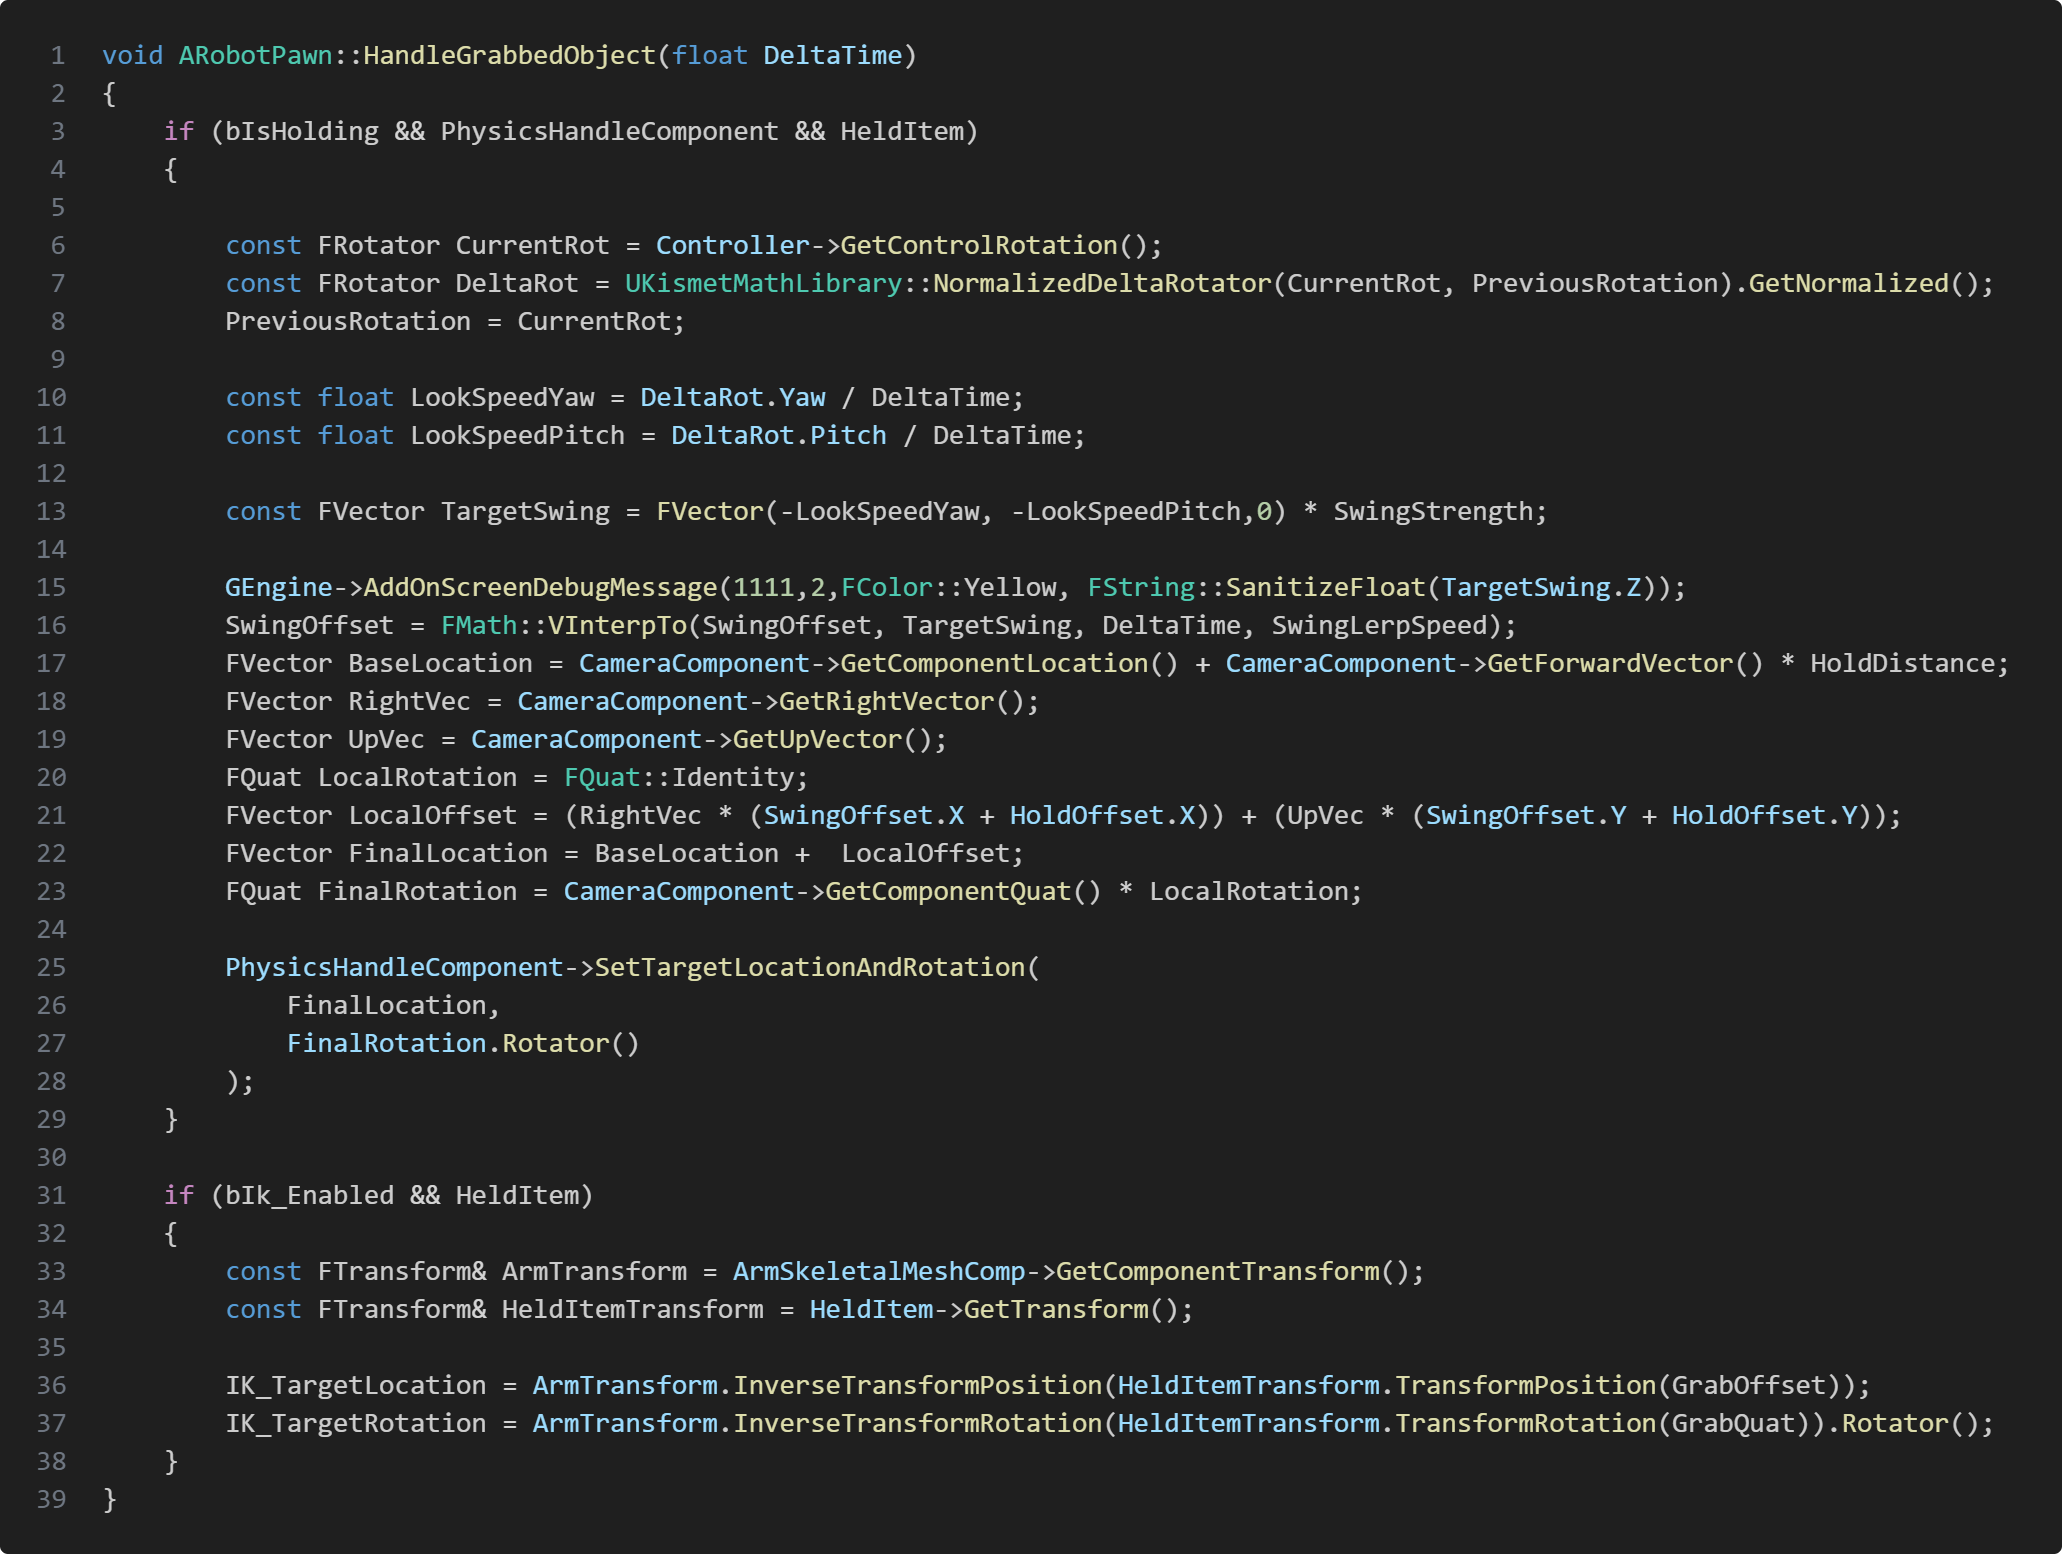
HandleGrabbedObject is what we use to update grabbed object position and rotation. This also manages swinging of the object depending on how fast the character is turning. Using the camera's location and forward vector we can update the grabbed object's location to always be in front of the player but also how far the object is held at by multiplying HoldDistance. By calling this function in tick the grabbed object will follow the player when moving and looking around allowing us to carry the object.
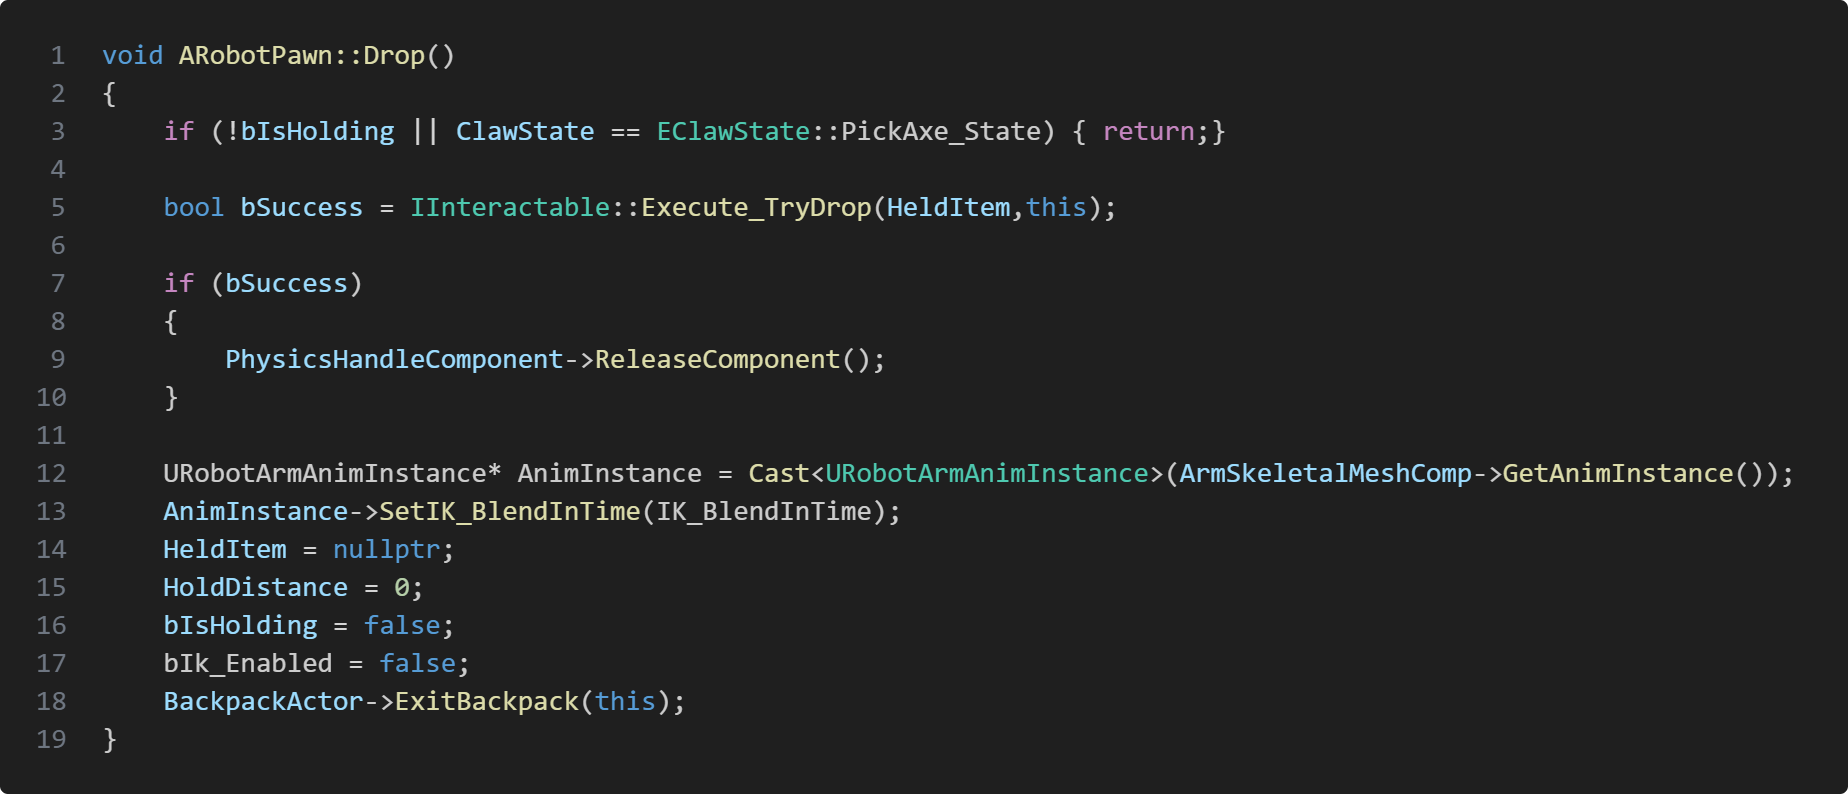
Dropping a grabbed object is also pretty simple, since physics handle component can also handle that. All we had to do is make sure that conditions are met to be able to drop and reset values.
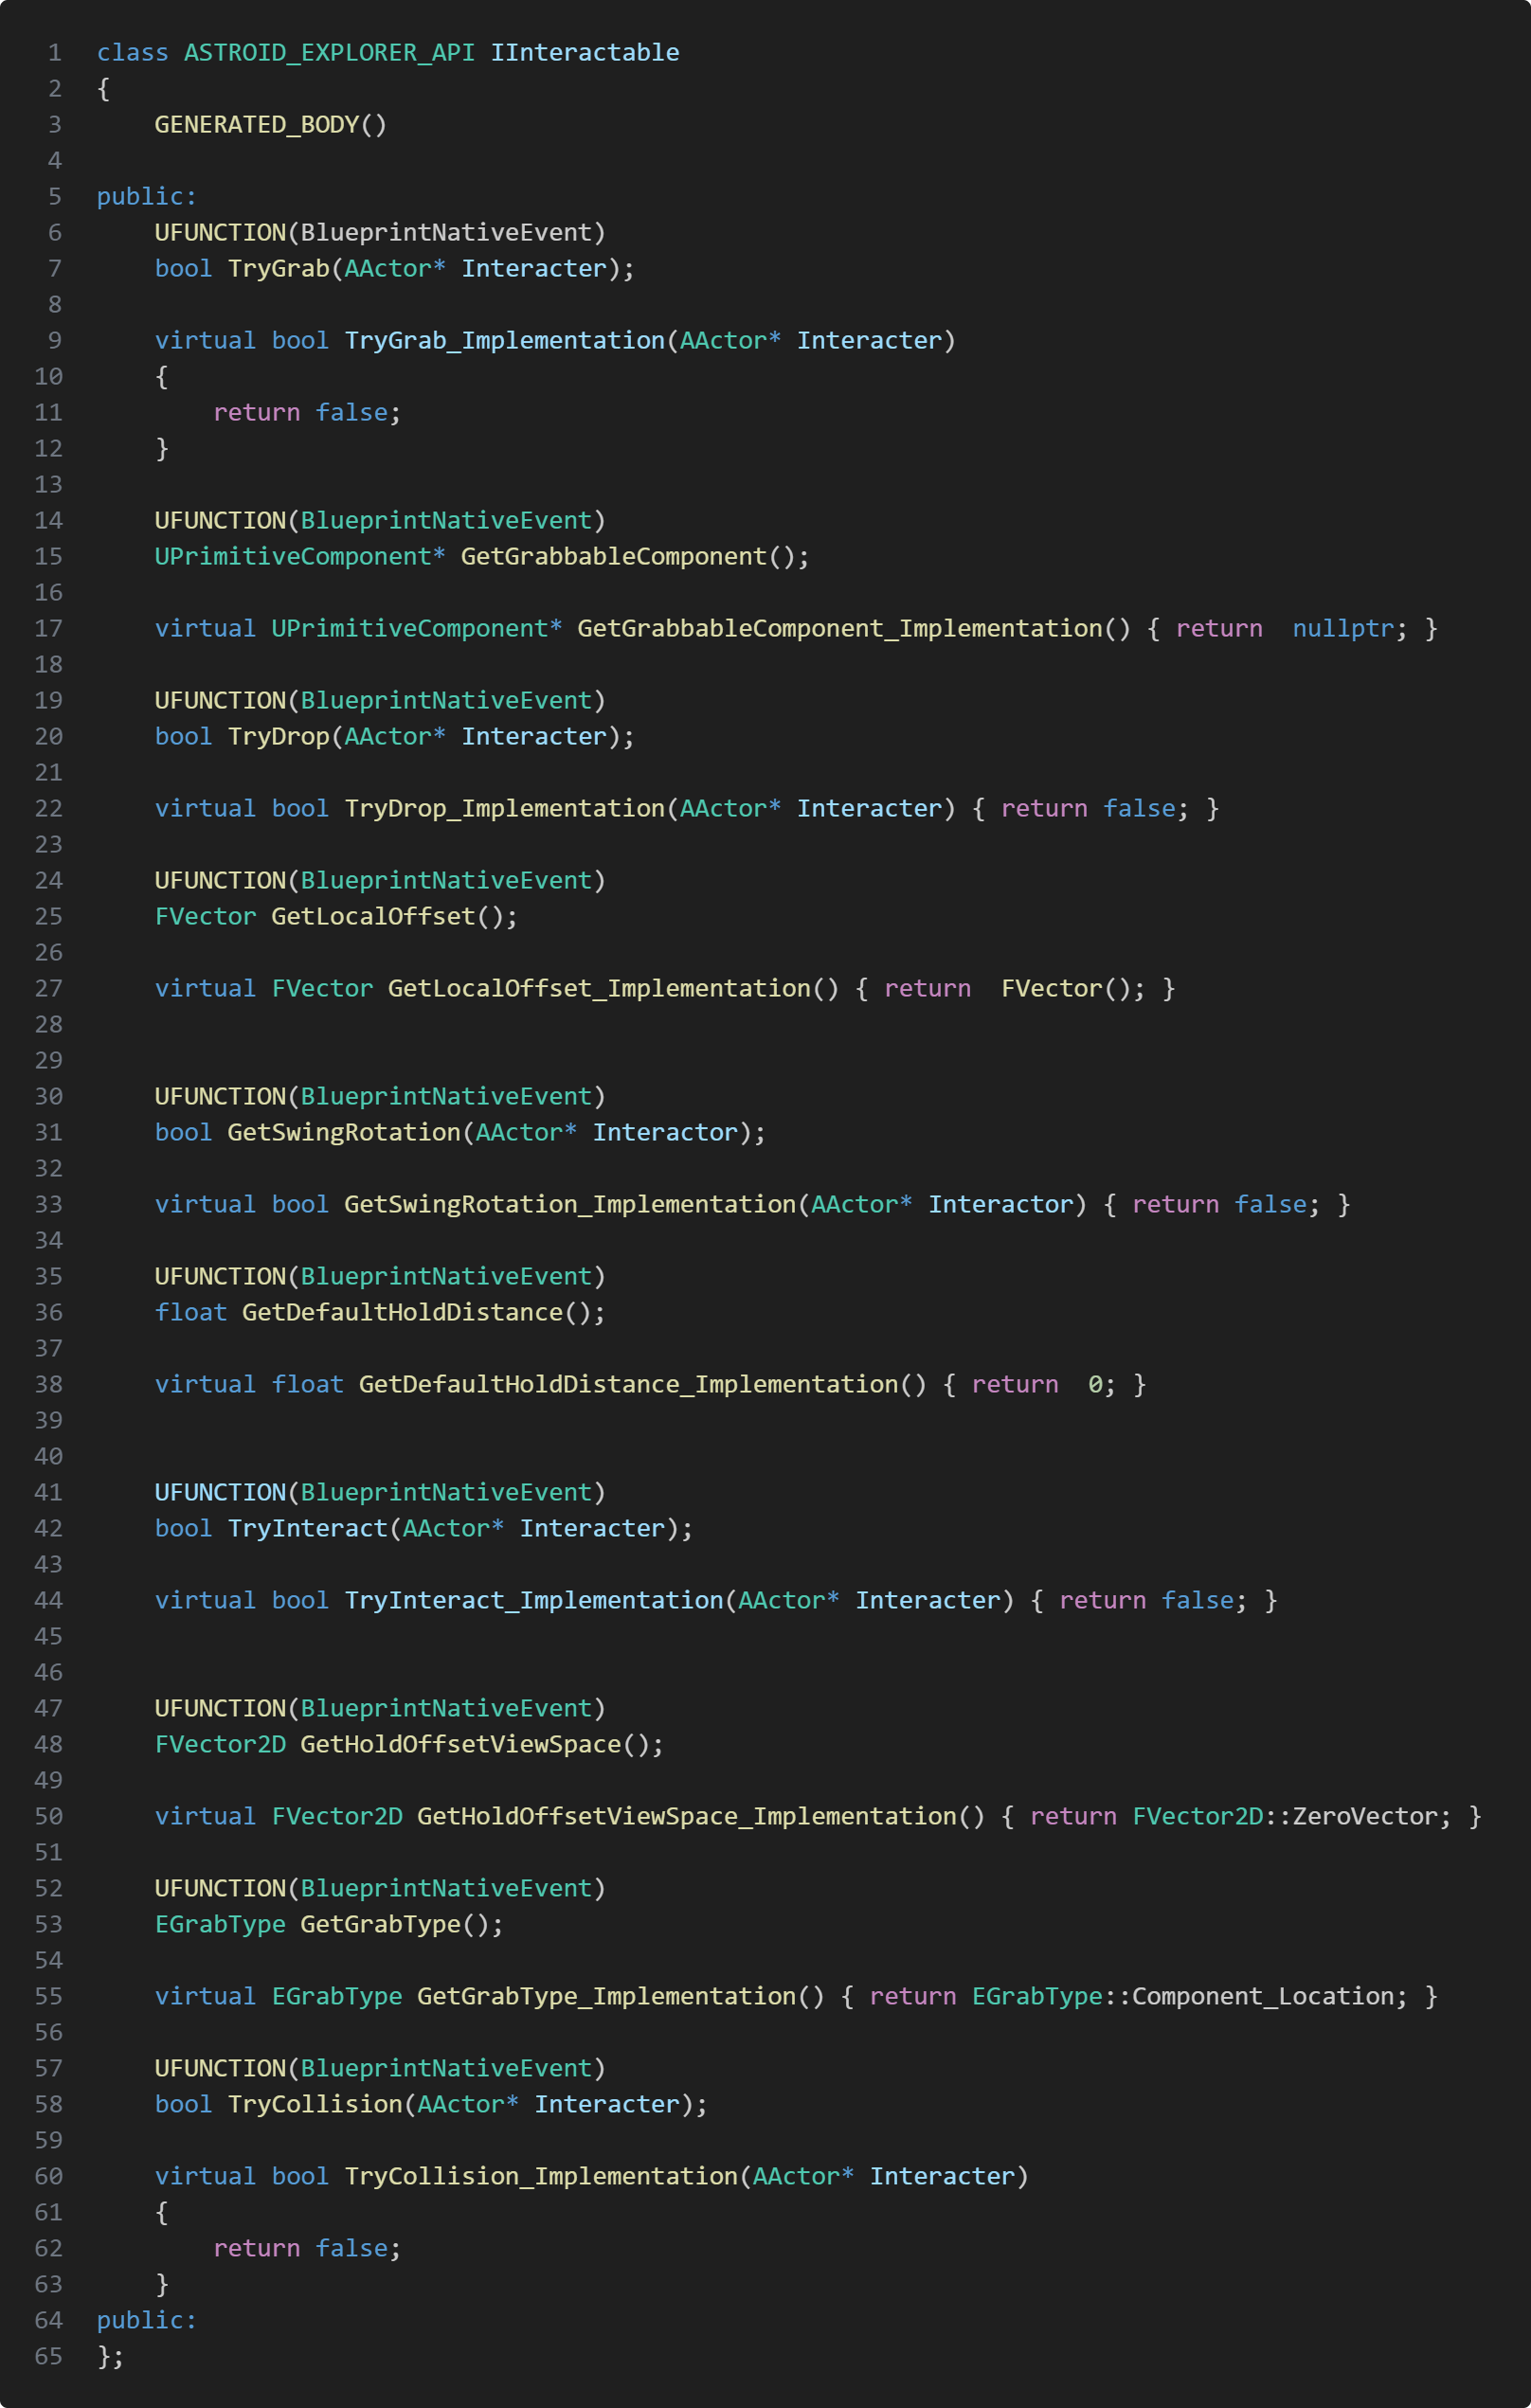
We also wanted to have different type of grabbing depending on what object we we're grabbing. Each grabbable item has the interface IInteractable.
Having IInteractable made it very easy to create new game object that can be grabbed but also where to grab, what is the initial hold distance and etc. As mentioned earlier each grabbable object has a grab type.
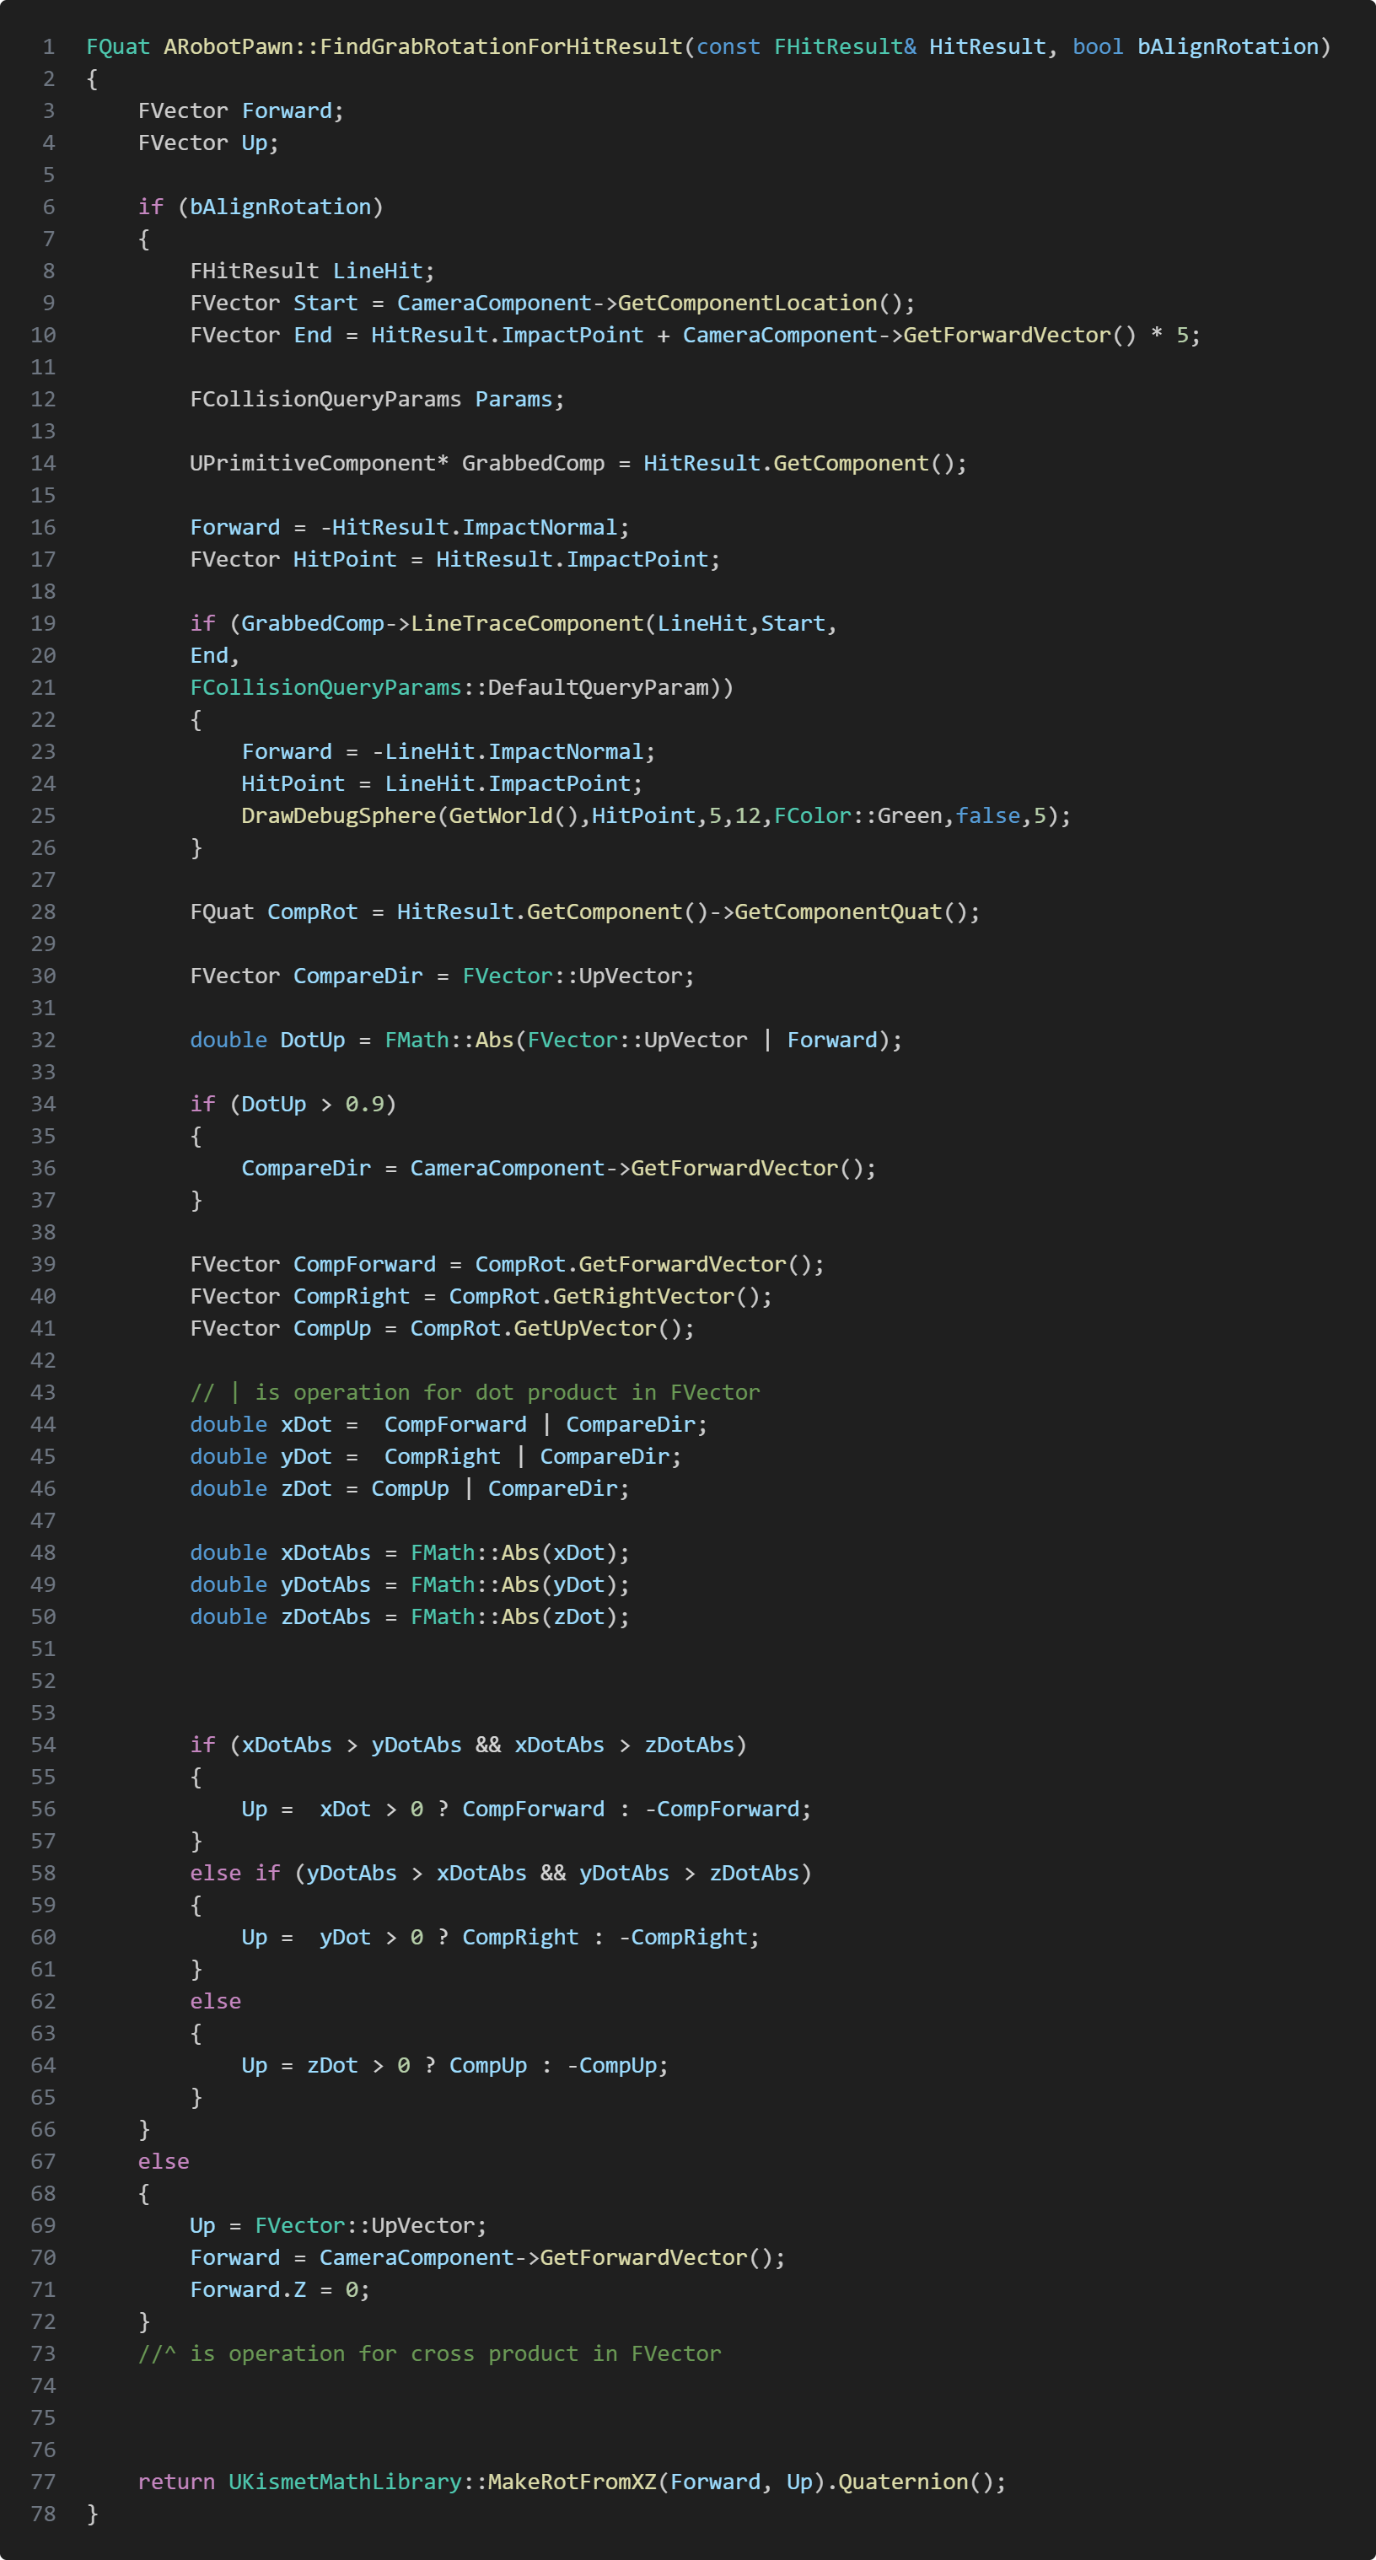
This is how each grab type feels like.EGrabType::Component_Location: The grab feels anchored to a fixed location. Even if the player clicks the object somewhere else the physics component will still grab the fixed location. Very similar to grabbing a door knob.EGrabType::Hit_Location: The object feels like you grabbed it at the exact surface point where the grab detection hit. If the player grabbed a box by one of the edges you’ll drag it around from that spot.EGrabType::Hit_Location_Aligned: The object feels very similar to Hit_Location grab type. The difference is the rotation of the grabbed object. Picking a wooden board from the floor it's orientation will always have it's initial orientation.To get the correct rotation for grab type Hit_Location and Hit_Location_Aligned, I created a helper function FindGrabRotationForHitResult.
To find the rotation for aligned rotation I cast a second trace to get the precise normal by tracing from the camera to our initial trace's impact point. If we hit the same component we use the second trace's inverted impact normal as our forward vector and hitPoint. If we don't hit anything we use our first trace's inverted impact normal as a fallback. Now to be able to send back the correct rotation I need to find which local vector of the grabbed component is closest aligned to the world vector. I chose to compare with the world's up vector, but before starting comparing vectors, I check if our forward vector is aligned with world's up vector, if so we instead use our camera's forward vector to compare.
Here we get all of our directional vector from our component and perform dot product with comparing vector. Depending on which axis dot is closest to 1 we make our Up vector to be that vector, and when we got our up vector we can finally make the correct rotation for alignment. To get the rotation for grab type Hit_Location our Up vector is the world's up vector and our Forward vector is the camera's forward vector
Take Aways
In this project I learned a lot about animations, it was my first time attempting procedural animation.
The end result isn't perfect but I'm still proud of what I managed to do in less than 7 weeks and got a better understanding how to work with animations in unreal.This project was probably the most complicated project I've worked on so far. The reason is because our physics based grab mechanic had different sort of grab depending on what object the player is trying to grab.This forced me to come up with a good structure to manage what object is grabbable or not but also what type of grabbing it should be. Should the object have the same rotation when grabbing it or should the rotation be aligned with the player's look direction and so on.My solution was to use an interface called grabbable. The interface has all the information the physics handle needs to grab but it also gives what type of grab the object is. This way it was easy to create new actor's and make them grabbable, but the biggest struggle was making the robot arm animations, since it needs to "reach out" to grab but also swing with the held object when looking around.What I did was have the robot arm to be a skeletal mesh and use IK_Body to make the arm sway with the object. I had to create a custom animation class to be able to send transform data to the arm to move the arm to held object's world position. This way I could give the position of the held item from the player character script to the animation script and have the hand follow the held item with physics.
Information
Engine: Unreal Engine
Language: C++
Duration: 4 Weeks
Version Control: Perforce
Contributions
Anomaly Camera system
Clipboad system
Picture system
Shaders
Anomaly Detection mechanic
Clipboard's picture animations
About Project
Something's Off is a detect anomalies game where the player has to memorize the level, and later find what has changed and take picture of the anomalies. The game has two phases, the day phase and the night phase. In the day phase the player has time to memorize the building.Taking pictures in day time gets stored in the player's clipboard. Those picture can be used in the night phase to compare rooms and detect what has changed. The night phase is where anomalies appear and the player has to take pictures of the anomalies to gain money for upgrades but also making sure not to go in debt. The game focuses on replayability, each time the player starts a game, the anomalies are randomly selected. Making each playthrough be different from before.
Anomaly Camera
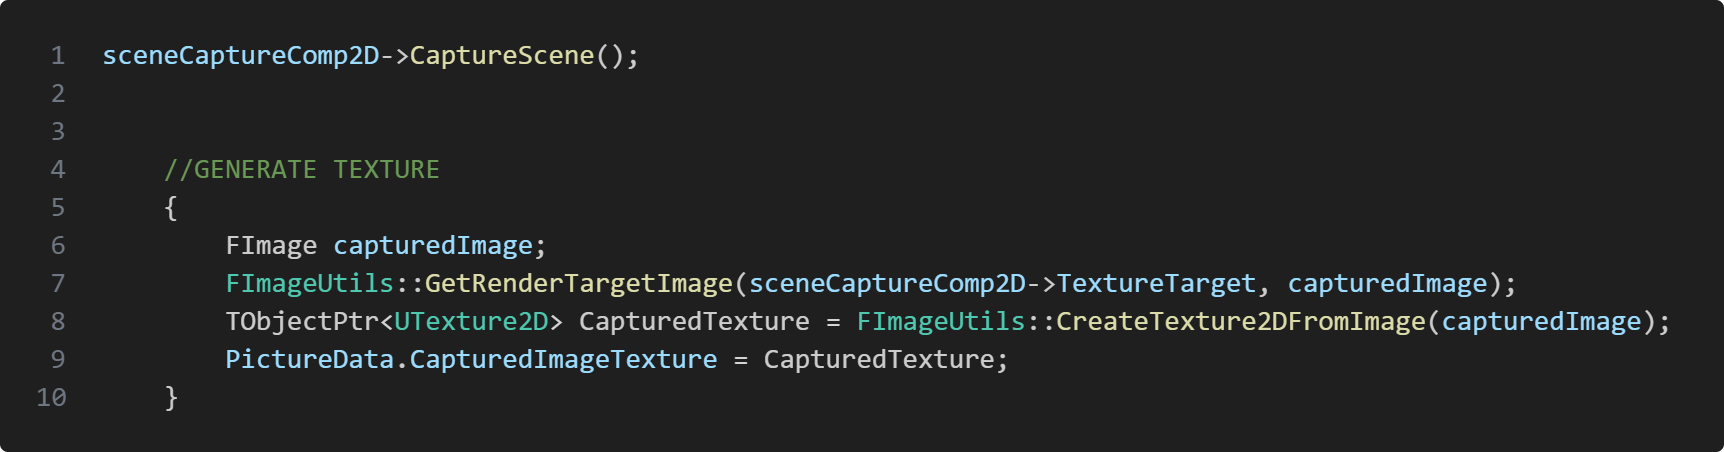
The AnomalyCamera class is responsible for generating textures for pictures but also detecting anomalies and set picture data. To pictures I used Unreal's USceneCaptureComponent2D. USceneCaptureComponent2D makes an image of the scene, this way when capture the scene I can generate an image which I later create a 2D texture.
Storing Picture Data
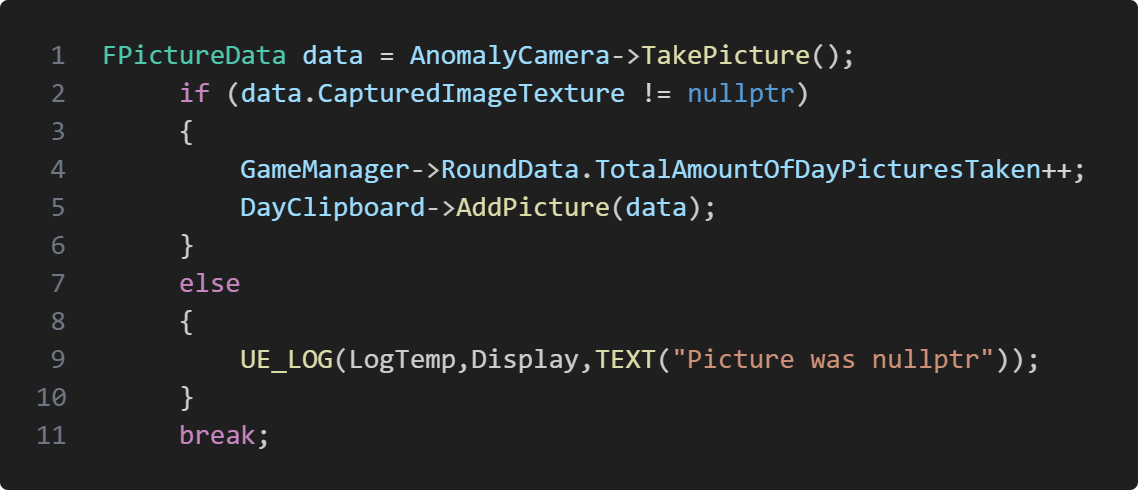
Whenever a picture has been taken we want to store the data of the screen shot. So I made a struct just for picture data called FPictureData. The struct has a smart pointer to store captured image texture but I also store detected anomalies in the picture, to apply shaders.When taking a picture I create a new FPictureData instance and assign captured anomalies and the image texture to the new created data struct, which I later on return it. The reason why I return the data is because the camera's TakePicture() function get's called from the player character. I then copy the data inside the player character and send it to the clipboard which generates a picture from the data. Since the FPictureData is created inside the camera's TakePicture() function.
Detecting Anomalies
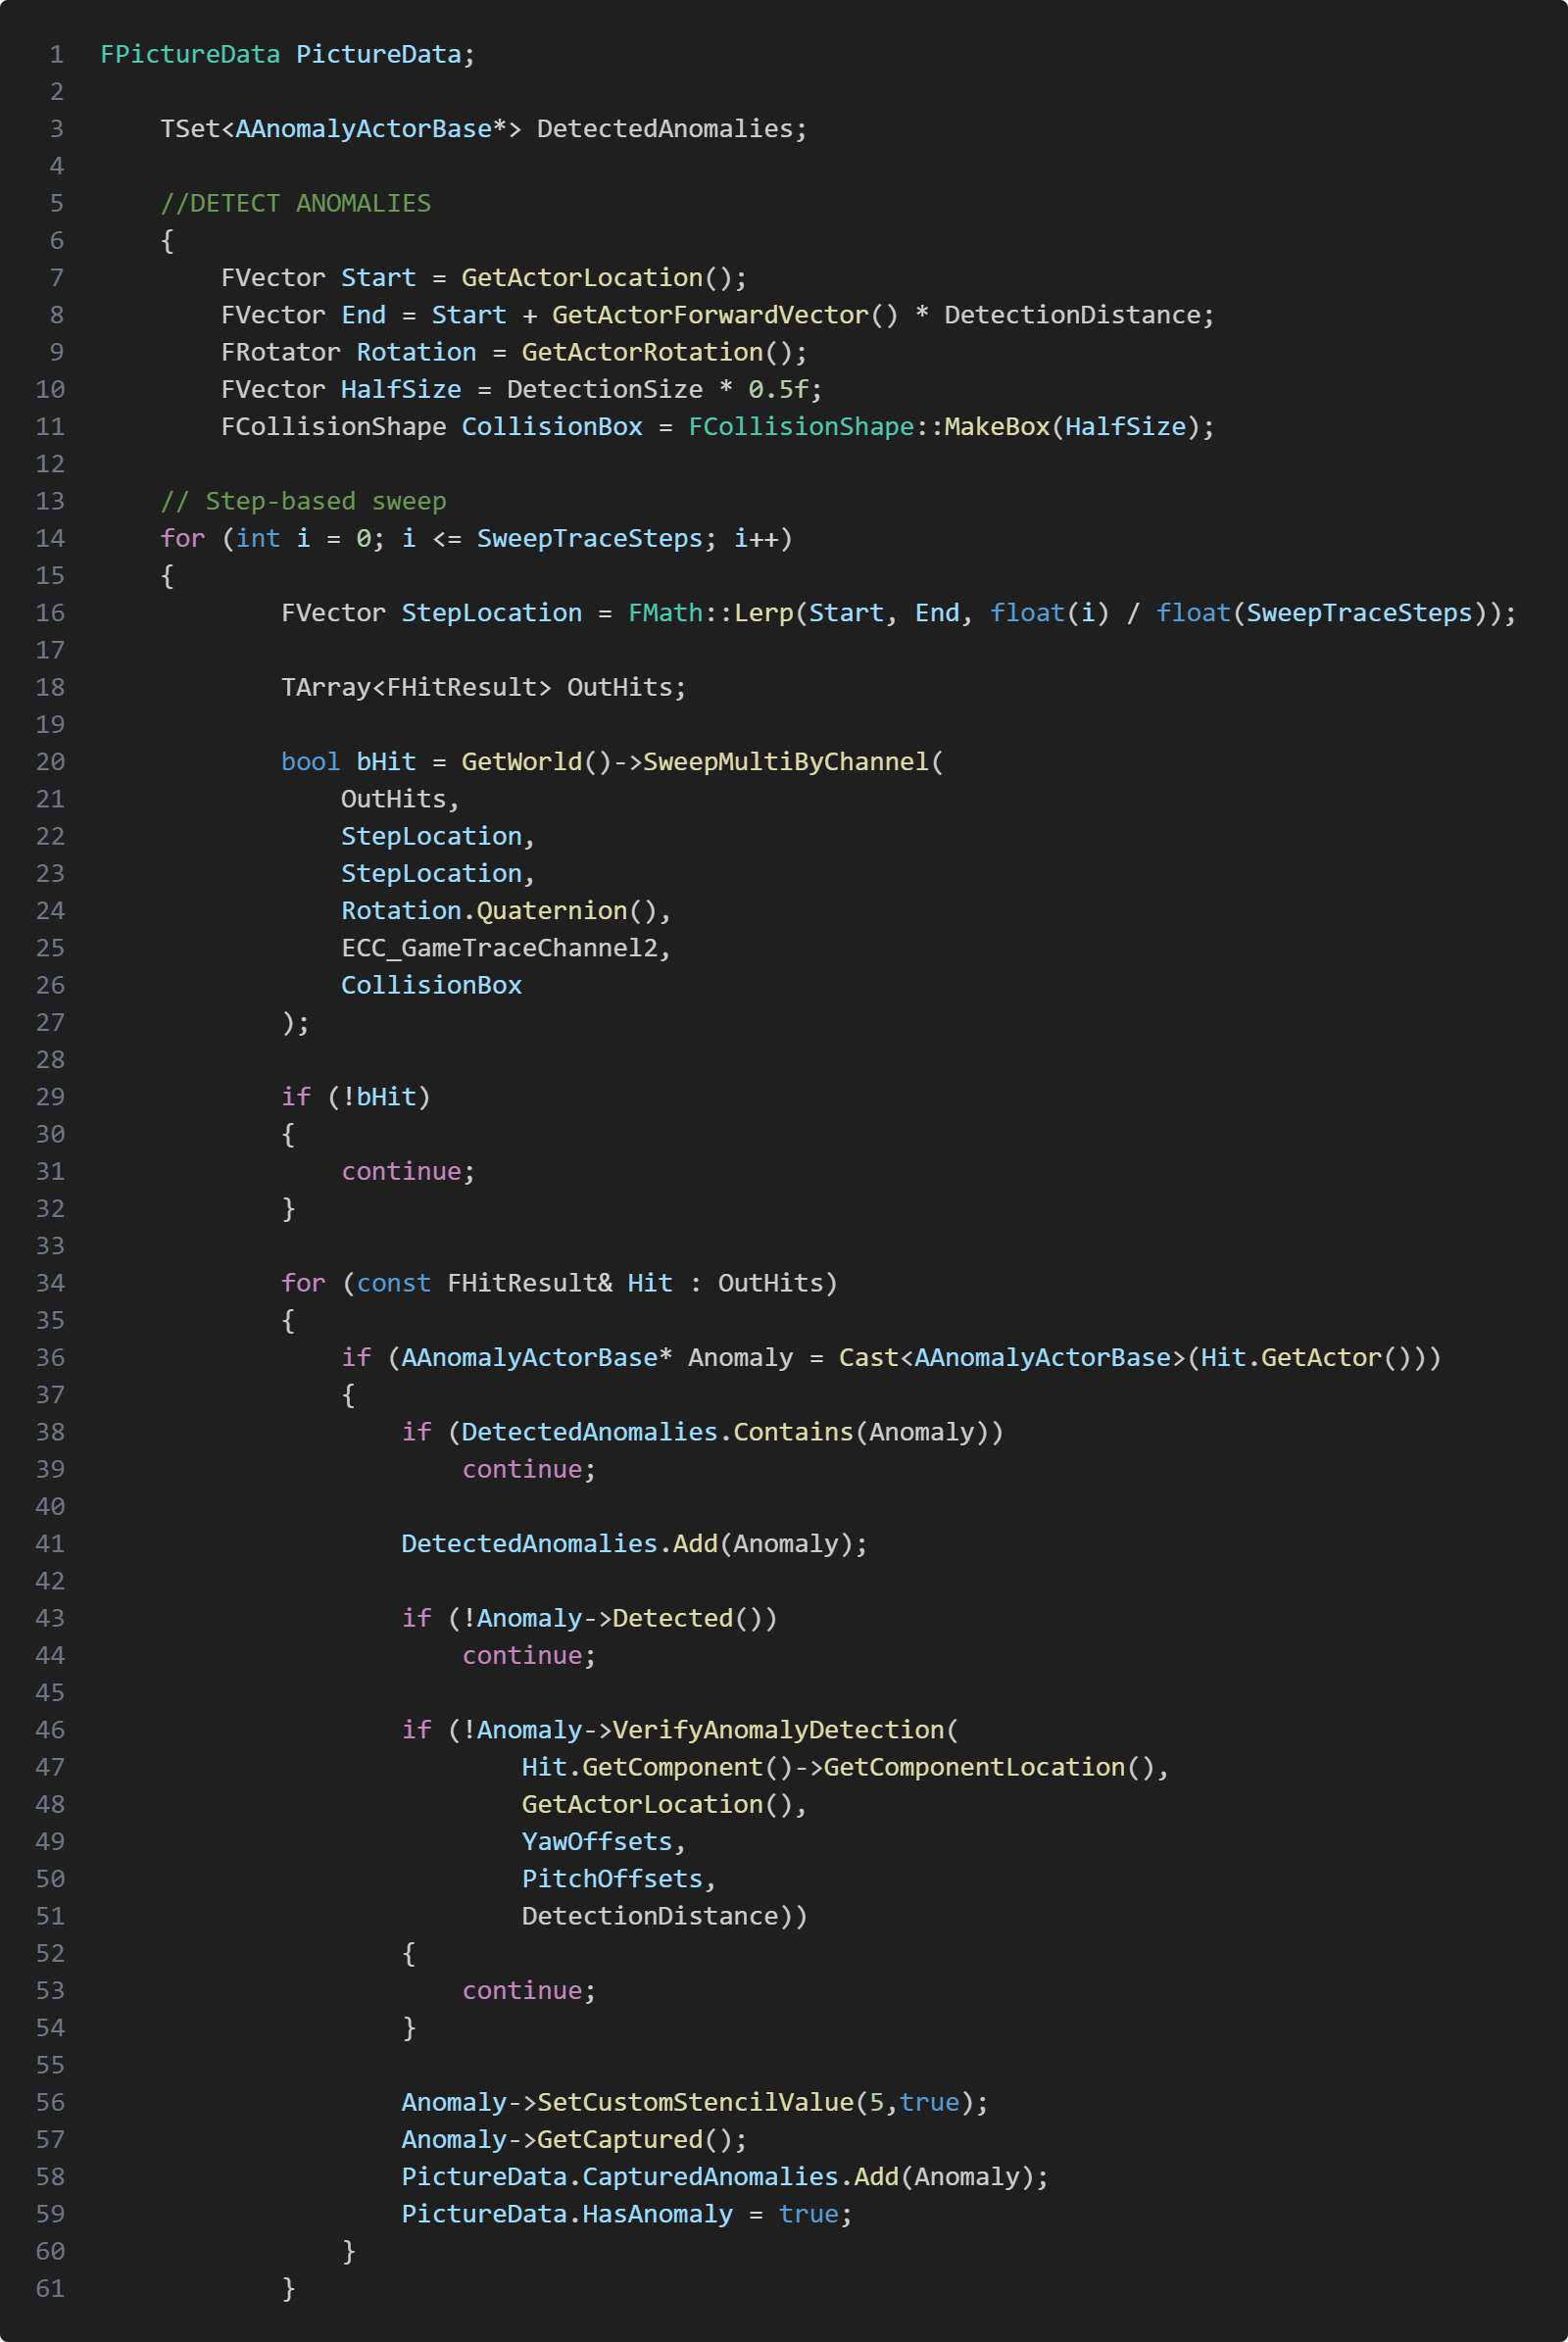
When taking a picture we wanted to be able to highlight in the picture which anomalies are in the picture, to make it easer to see what was the anomaly or anomalies. That's why we needed a sweep that can pass through multiple anomalies and store them in the FPictureData struct.Before I start with doing a sweep to detect anomalies I first create a set to store anomalies that got detected. The reason why I use TSet is to avoid storing duplicats.To be able to detect multiple anomailes when taking a single picture I had to create a loop where I iterate depending on how many sweep trace
steps I want and then lerp my stepLocation from start to end where my alpha is dependant on which step the loop is currently on divided by total sweep trace steps, where I use Unreal's SweepMultiByChannel function and use StepLocation as the start and end.If I have a hit I iterate through the hit result and check if my set already contains the anomaly. If not I add it to the set. I then do another trace to make sure that it's not behind a wall. If I have detected the anomaly/anomalies that I can see, I then add it to picture data's detected anomalies array.
Clipboard
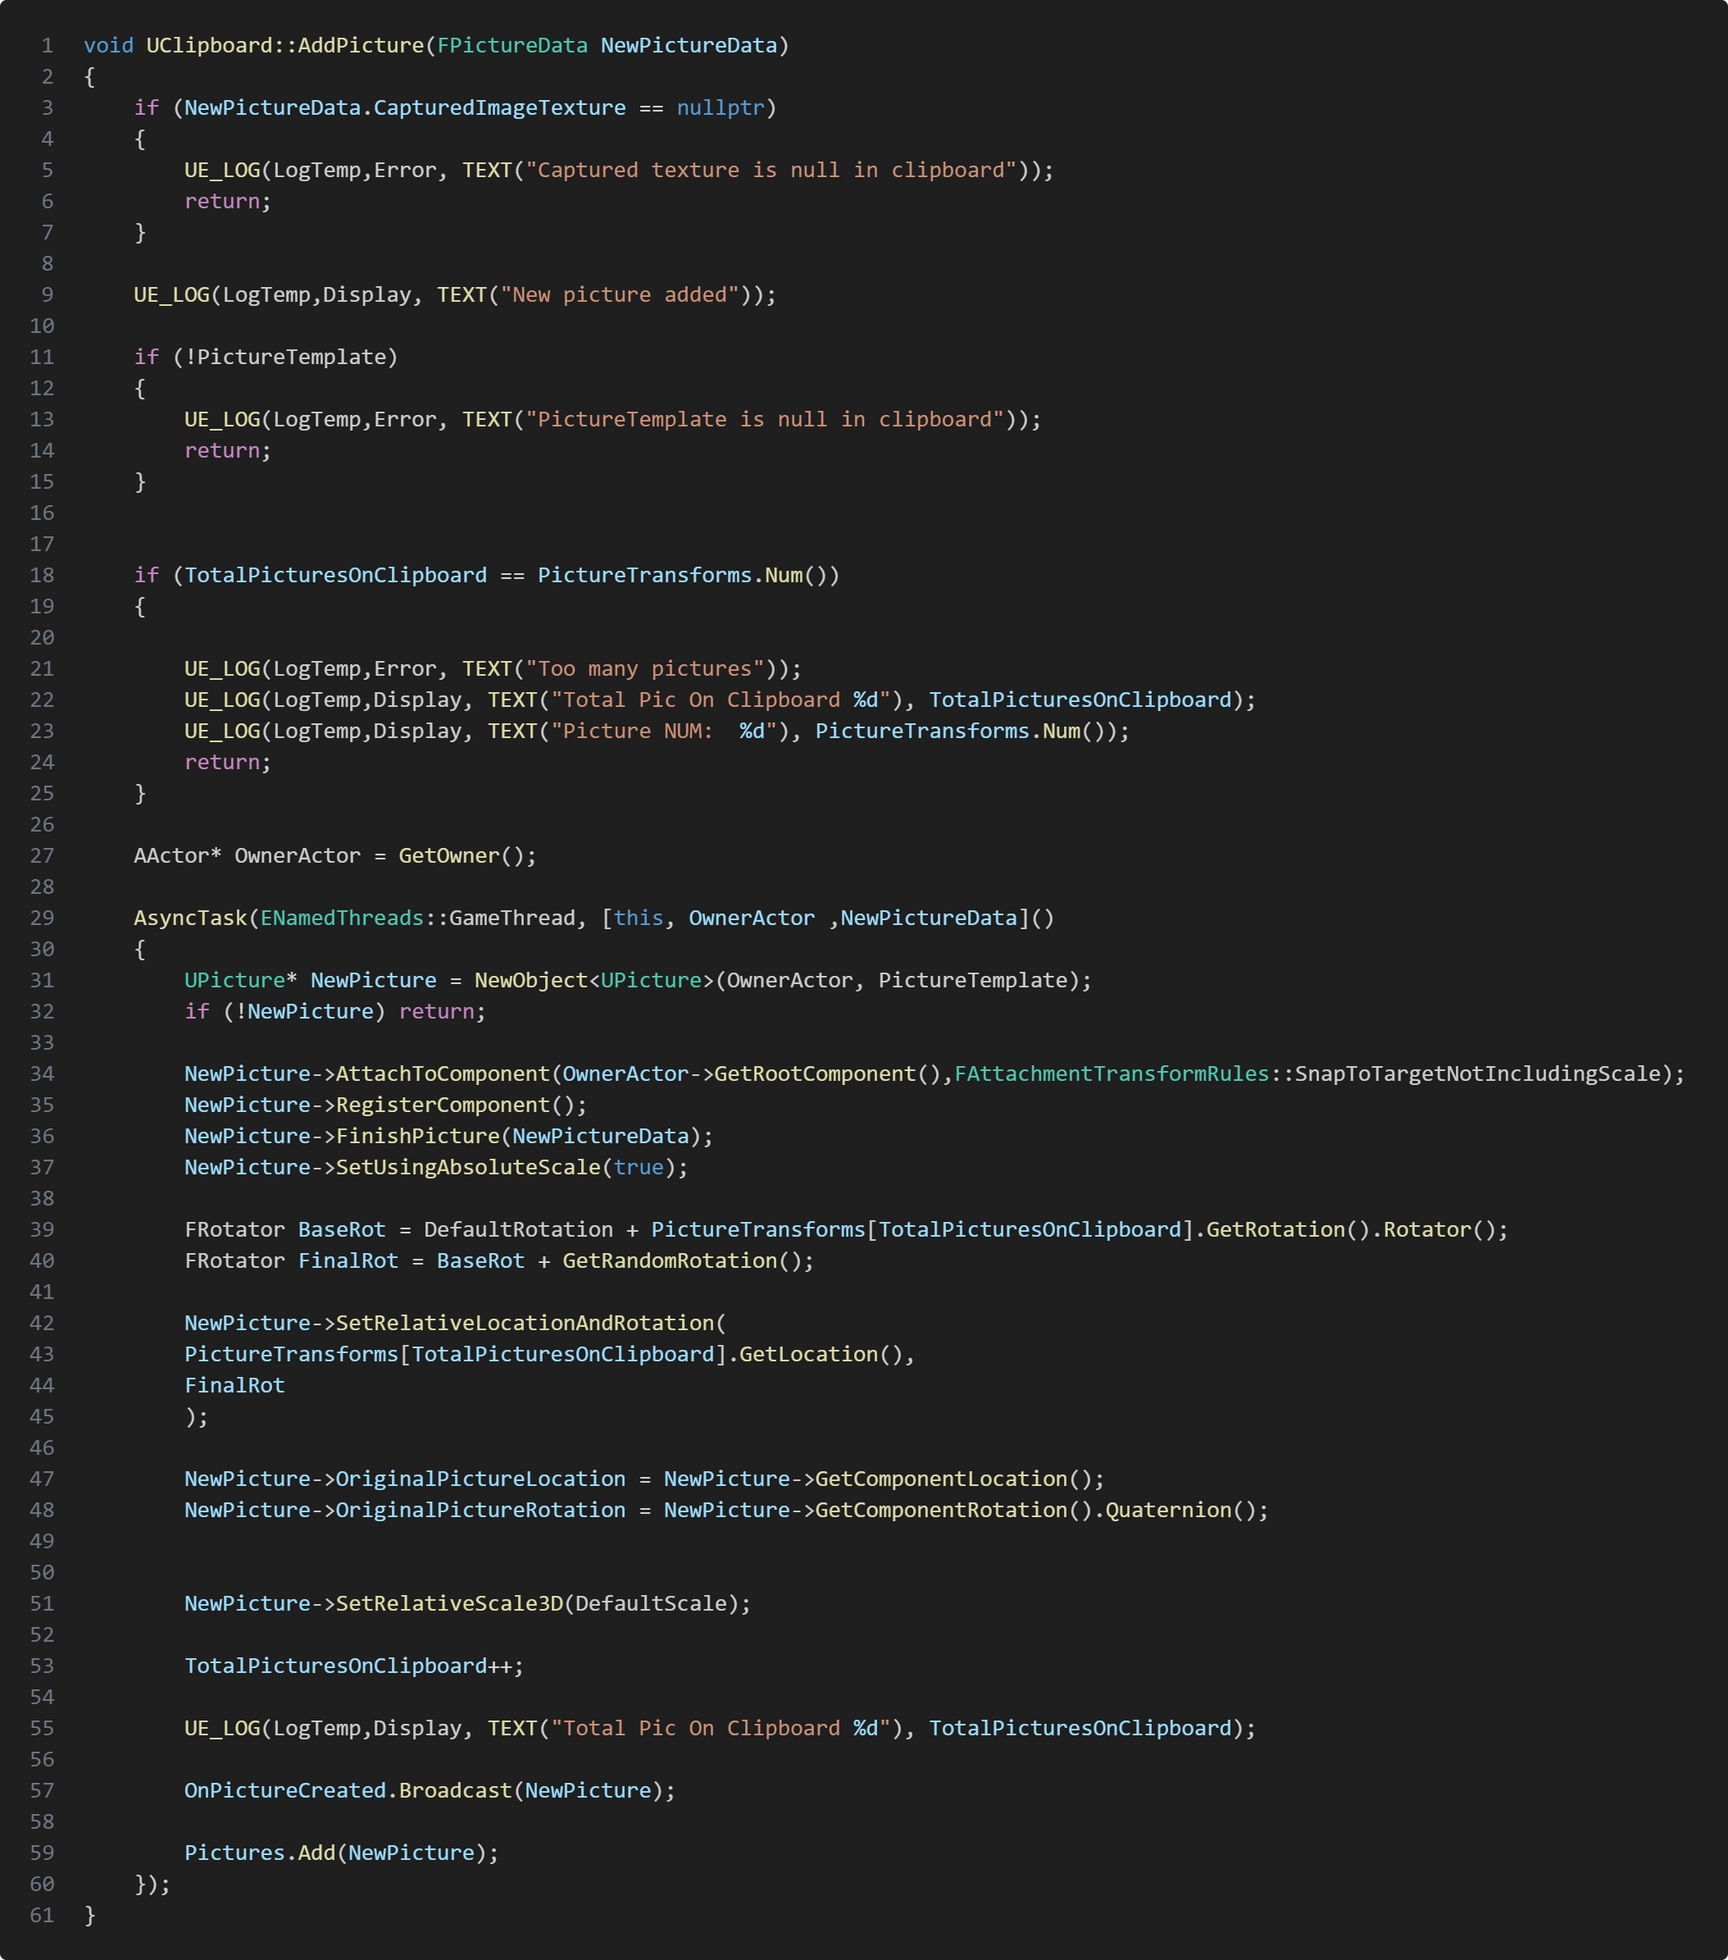
I have two types of clipboards. The DayClipboardand the ResultClipboard. The DayClipboard is used to store pictures taken in the day. You can pull up the DayClipboard to see the picture's you've taken in the day time, and the ResultClipboard only stores pictures with anomalies in them.Both the DayClipboard and the ResultClipboard has a ClipboardComponent in them. The ClipboardComponent is what actually creates a picture, meanwhile the DayClipboardand the ResultClipboard function to add picture calls the ClipboardComponent's AddPicture function. The reason why both DayClipboard and ResultClipboard has a ClipboardComponent instead of inheriting a base class for Clipboard is because I only needed to reuse the functions from ClipboardComponent without needing any polymorphism, so both DayClipboard and ResultClipboard calls ClipboardComponent's AddPicture function in their own AddPicture
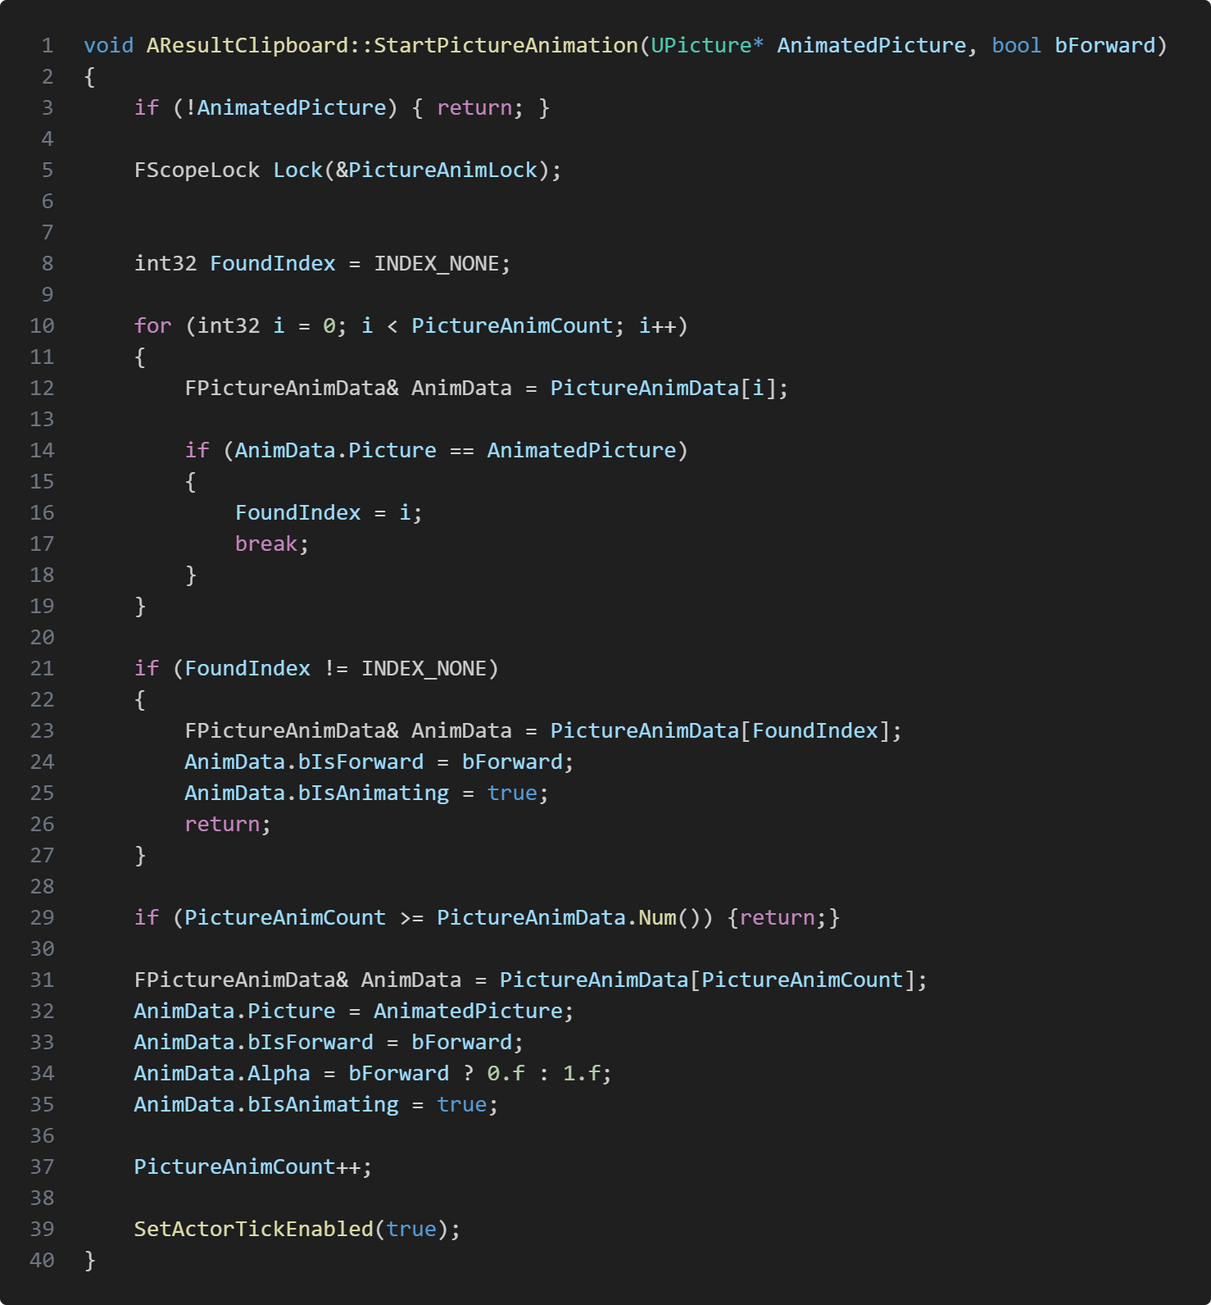
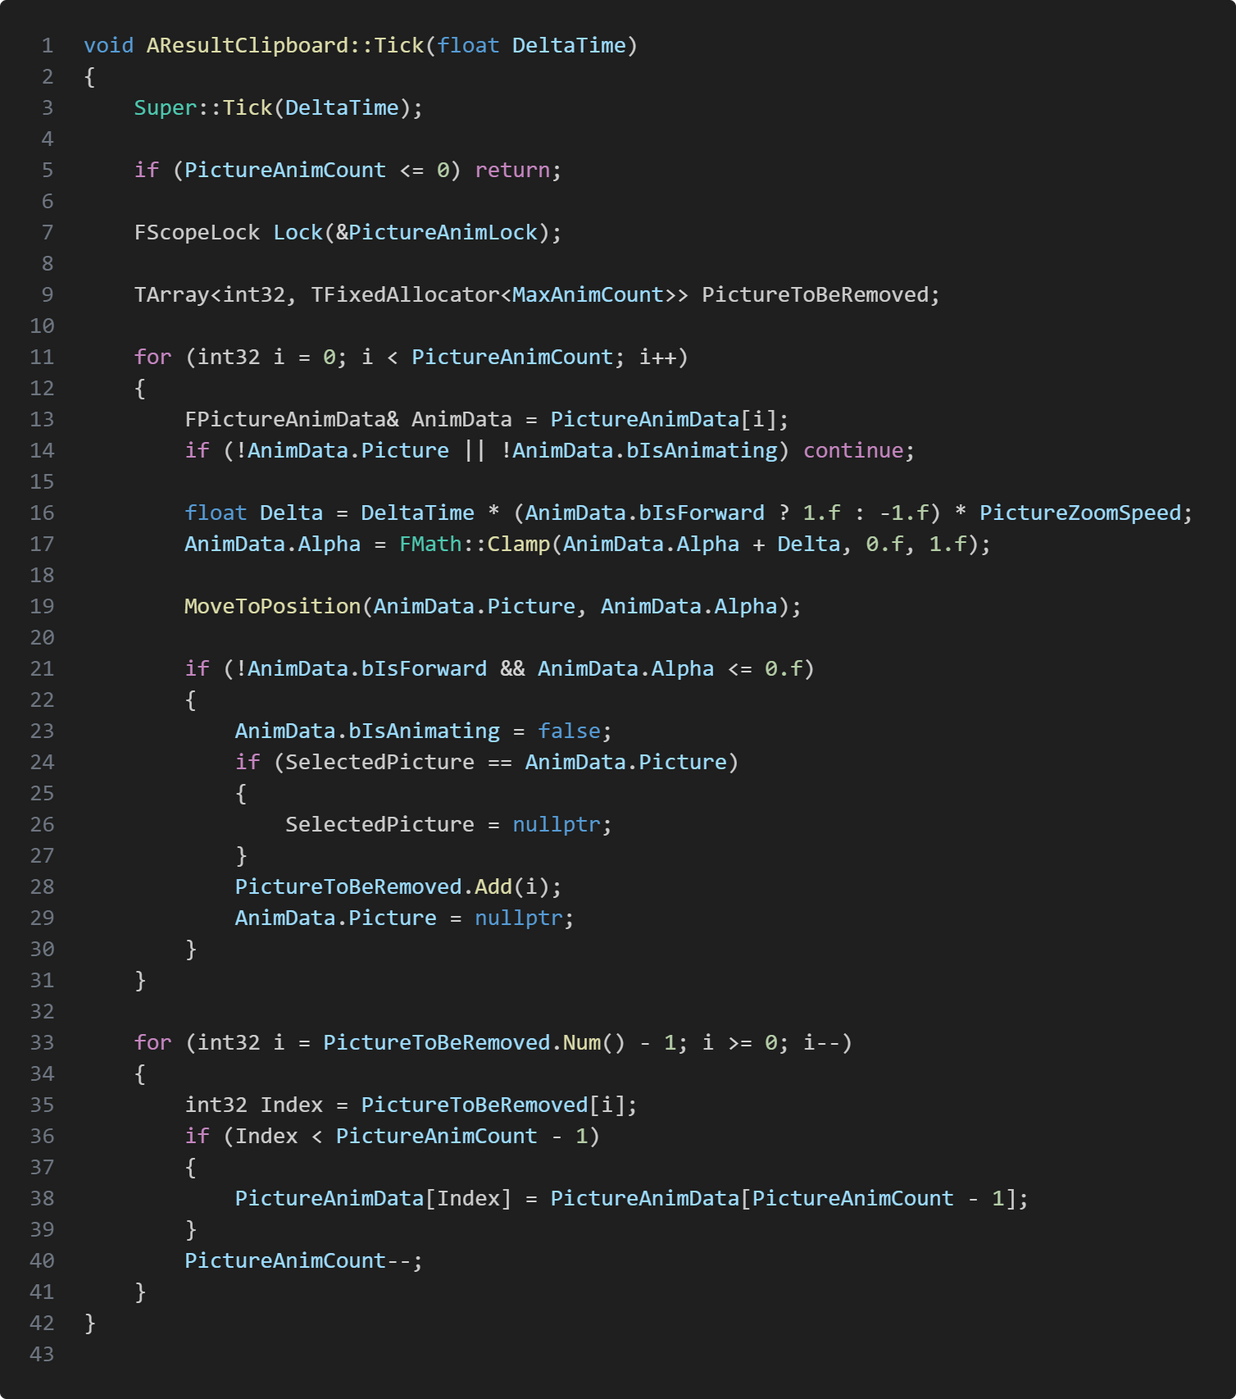
Clipboard Picture Animations
When creating the picture animations so they move closer to the camera when selected and back to their original position when unselected I created FPictureAnimData which stores the picture object, an alpha, if is moving forward and if it's in middle of animation. This is only for the ResultClipboard class.The ResultClipboard class has a TStaticArray which contains FPictureAnimData where the size is of max total picture animation count. When a picture is selected I iterate the static array which stores all the FPictureAnimData structs. When I've found the correct data which has the same picture reference to the selected picture, I break the search and set which index I found the correct animation data in picture animation data array.I then set the picture animation data's forward and that it is currently animating, and that the selected picture can tick.In ResultClipboard's tick function I start the animation for the selected picture by lerping it's position.
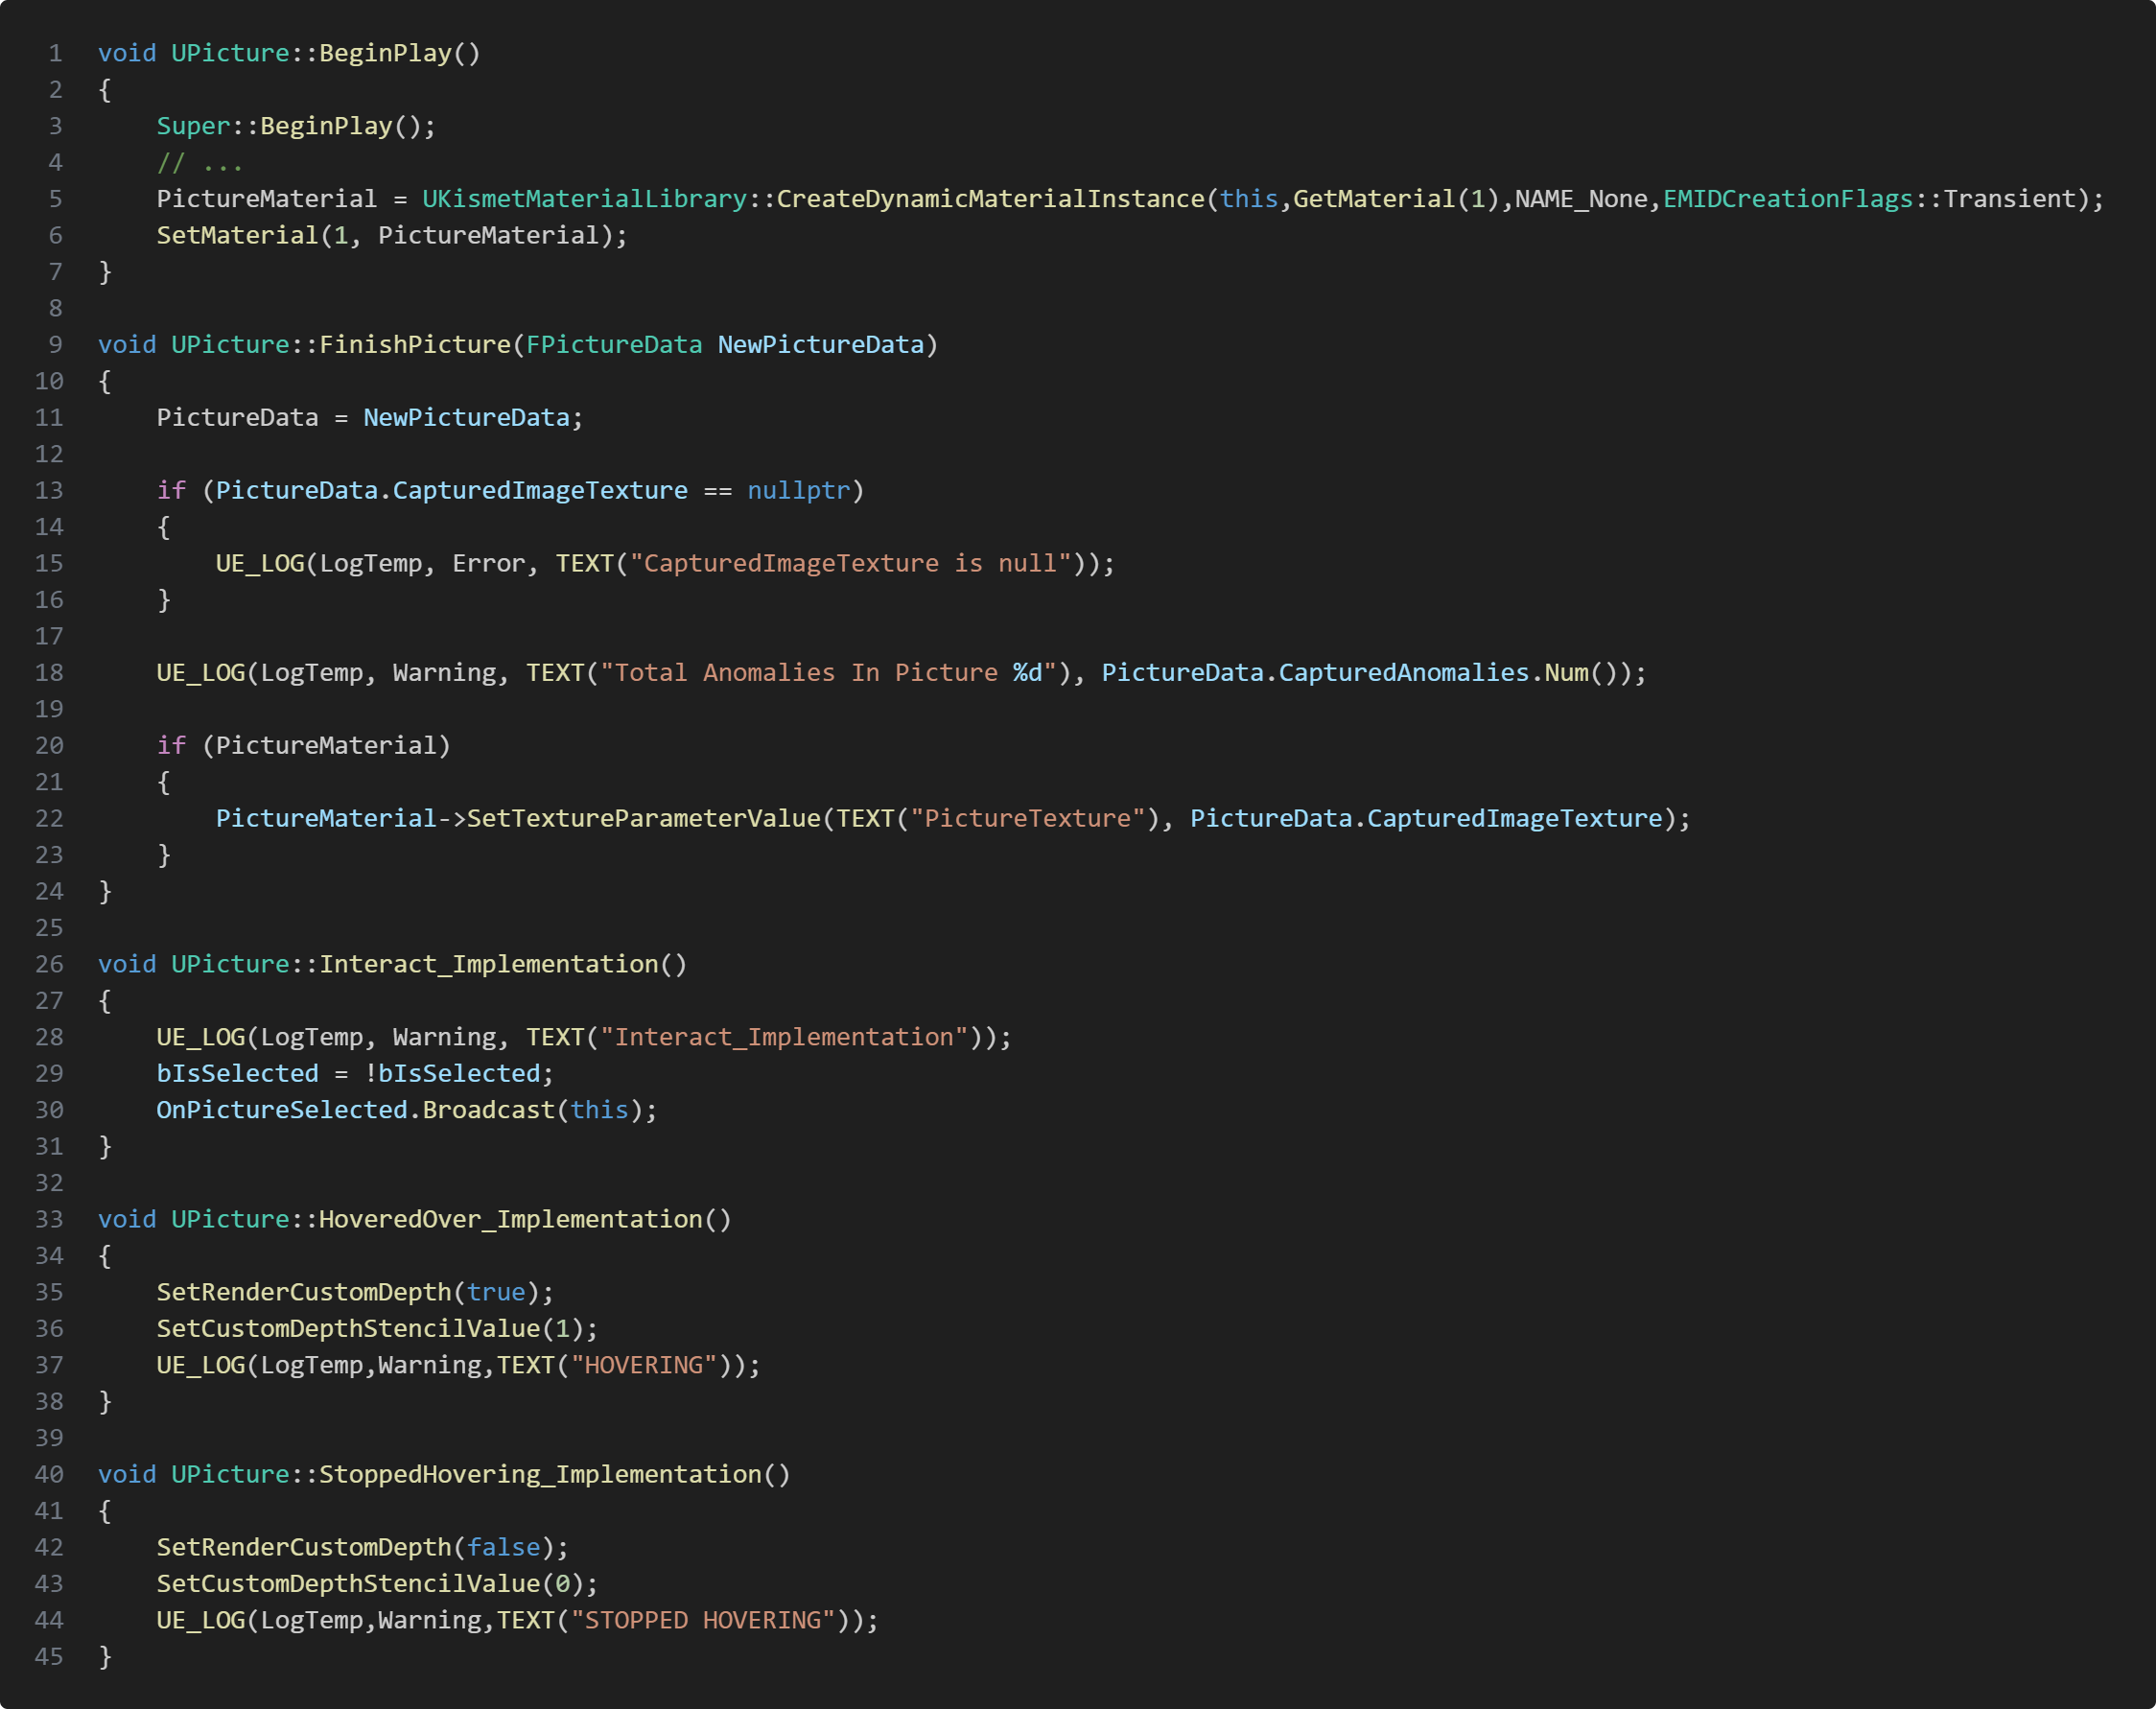
Pictures
The picture class is a child class of UStaticMeshComponent. This class mostly handle's setting it's own material and activating or deactivating highlight shader depending on if it's beeing hovered over or not. It also broadcast if it's been selected. FinishPicture function get's called from ClipboardComponent when being created.

Polaroid Picture
To make the polaroid material beeing able to show the captured image from USceneCaptureComponent2D I needed to create a texture parameter and then set the texture through code. I also added a normal texture for bumpiness of the picture which you can modify through parameters. One big issue we had with the polaroid pictures was lightning. There we're cases where the reflection from the light made it very difficult to see the picture, so I made that we can modify our roughness and specular on our material to somewhat reduce the reflection caused by lights.
Anomaly In Game
Detected Anomaly in picture
Anomaly Picture Highlight
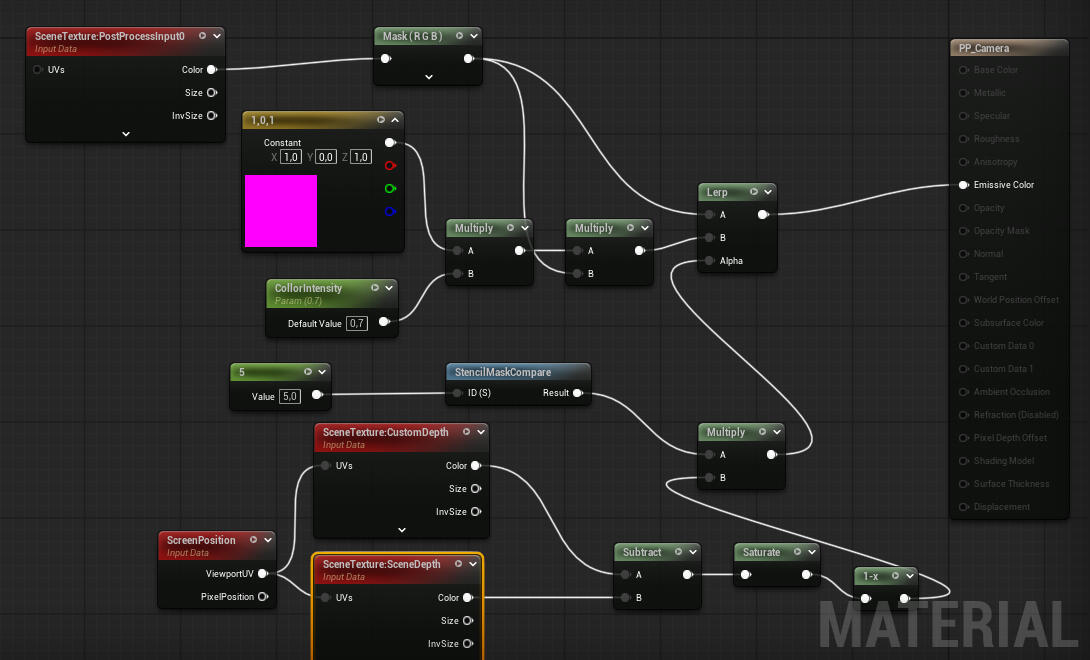
We wanted it to be easy to see what was an anomaly in the picture. For that we needed something to highlight the anomalies in the picture. The solution was to make a post process for the AnomalyCamera since that is the class that we use to capture the scene. For the coloring I'm using a stencil mask so that I can enable the highlight when detecting the anomaly and take the picture. This isn't visible for the player camera since we are only using this post process effect on the AnomalyCamera's scene capture component.
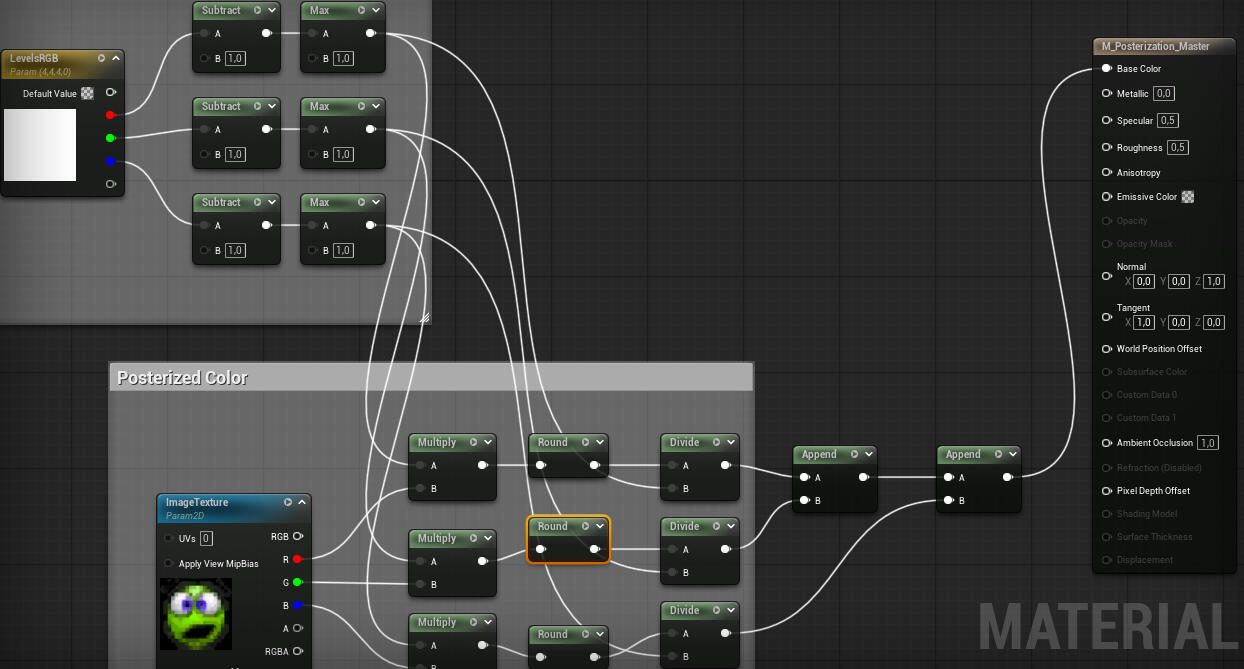
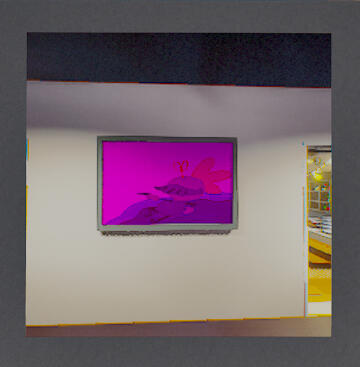
Posterization Shader
In our game we have different game poster from our earlier projects and they all look very different. To somewhat make them look a bit similar I created a posterization shader and applied it to all of the posters.
Take Aways
In this project I decided that I wanted to work with rendering and shaders since it was a new area of programming which I haven't worked a lot with, so I wanted to challenge myself in this project. I feel a lot more confident in my skills with shader but there is still a lot more for me to learn which I'm excited for. This project also made me more interested in graphics programming.I also attempted to use more composition instead of inheritance where I thought it would work. For example my Clipboard classes uses composition since I never really needed any polymorphism, I could instead just call the ClipboardComponent functions instead.